The process of creating a stage from its beginnings, from a sketch with an idea to its final version, inside the graphic engine, is a step by step entertaining to see and to create. In this small update of our Dev-Blog we will review the stages that are part of the creation of the assets for our game.
The visual style of the video game stands out for its simplicity, with the clear goal of giving the sensation of entering a story. For that, we complete a series of steps prior to the drawing itself. Here I will show you the step by step with a small part of the alpha build that we designed, and which we will call “The Cottage”.

First Sketch -> Final Sketch

Version Build In-game
Making a game by hand is a job that takes a long time, however, seeing the results is worth it. Every little detail started at the beginning with a two-minute sketch (usually drawn with paper and pencil), with the whole team debating how (and why) it should be like that. For us, the first version of the Cottage were two giant, hollow trees that someone once used as a home.

First Idea of the Cottage
There were many things that did not convince us of this first design. Although it had that detail of nature that we liked, they felt too forced in relation to the other trees in the scene (those that were not so big nor were they as dead as these two). So after several meetings, we decided to create literally a house in the middle of the forest. Wondering what a house was doing there and what had happened inside it was a perfect mystery for the meaning of the scene.

Final Sketch
Before drawing the assets of the scene we first had to know how it looked inside the game, what was left inside and outside the screen. So I sent our programmer who started to build the level using the simple primary sketch, initially with the default Unreal blocks. At the time of concluding that stage, the level looked more or less like this:

UE4 Blocks
On this basic version of the level, the drawing work begins. When all the blocks are defined, the level is transferred to a series of images that show me where I should draw. On this image, I start designing how the in-game cottage will look. Quick sketches that will be reviewed by the team again and again until we find the design that fits what we wanted for this part of the level.

Cottage sketch
When deciding what we wanted, the fun part began. Divide the cottage into the different blocks that would make it up, and give the details corresponding to each of these blocks. First, the lineart that will shape the passage of time over this house, in its cracked walls and raised ground, the broken roof and nature slowly breaking through the structure. Slowly, our cottage is taking shape.

Walls and floor

Finished Lineart
At this stage of development you can already see what we were looking for. The fairytale style that only lacked the color application to achieve complete immersion. Each of the pieces, separately, were then taken for the painting process, a layer of watercolor that would give the final touch.
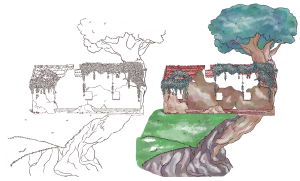
Lineart and Color
Uff! It seems to be ready. Now that the coloring is finished I can deliver the images to our programmer, so that he replaces the Unreal blocks with our new assets. He is responsible for carefully fitting each piece so that the main character can walk through the cottage, and discover the secrets that it keeps.

Replacing the blocks
The result can be seen much better in the following video, where the cabin joins the rest of the stage drawn and painted inside the graphic engine.
That’s all! I hope you enjoyed my first entry in our Dev-Blog. Thank you so much for all the comments in our social media, all your feedback about the art of the game is really making me happy, so please share and follow us!
Soon I’ll be talking about characters design and concept art, so stay tuned!