PaperZD exists as an answer for Unreal Engine’s lack of support for 2D based games, and seeks to help its users to easily create complex animated characters, by binding the logic in a similar fashion as it’s done in usual 3D development, while adjusting the experience to better serve a 2D game.
The plugin comes with its own “Animation Blueprint” implementation (paired with a custom blueprint compiler) with its own Animation Graph, this allows for easy to follow animation logic for each character or entity.
Support for specialized “Animation Notifies” is also present and can be added to each animation sequence that requires it.
Besides this, a plethora of other 2D specific features are available for the user which will help create rich and complex characters without the fuss of having to manage the timings themselves.
PaperZD also allows for “Extensions” to be added to the system, which can allow for other types of animation sources to be used with the tool. These extensions can give access to manage skeletal 2d animation sources like “Spine2D”, “DragonBones” or “Creature2D” (or any custom one defined by the user).
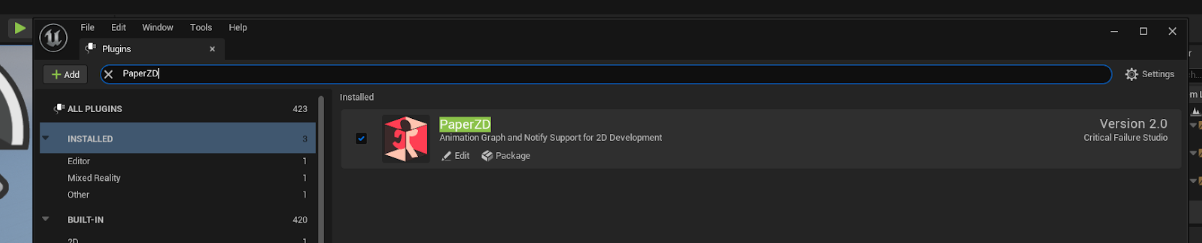
The current version of the plugin (called V2.0) heavily re-writes the old architecture and aims for creating a tool that can serve both big and small projects alike, becoming a pivotal piece of software for any user that aims to develop 2D games in Unreal Engine.
If downloaded via the marketplace, installation is already done and the plugin should just be enabled via the “Plugins” menu (An engine restart will be required).
For installing PaperZD as a “Project Plugin”, follow the same steps that on any plugin, simply add the plugin inside a folder called “Plugins” inside your project folder.
Installation of extensions can be performed by adding “Plugin Extensions”, which are intermediary plugins that give PaperZD the ability to manage other types of animation sources besides Paper2D. Due to the nature of these tools being external to the engine, said extensions cannot be provided in the marketplace and must be installed separately (More information in the “Adding support for custom animation sources” section).
Note for C++ users:
If you require importing and using the PaperZD classes in your game project (like inheriting from PaperZDCharacter or creating custom notifies in c++), then the “PaperZD” module should be added on your project’s “PublicDependencyModules” otherwise a linker error will trigger.
Note for v1.0 users:
Whenever the system loads an AnimationBlueprint that was created with a previous version (v.1.4.3) for the first time, it will update it and create an “Animation Source” for it, while also re-targeting every AnimSequence to now have said object as parent. Due to the nature of Unreal Engine’s Loading protocols, we cannot force the packages to save and can only mark them dirty, it is up to the user to ensure they are properly saved.

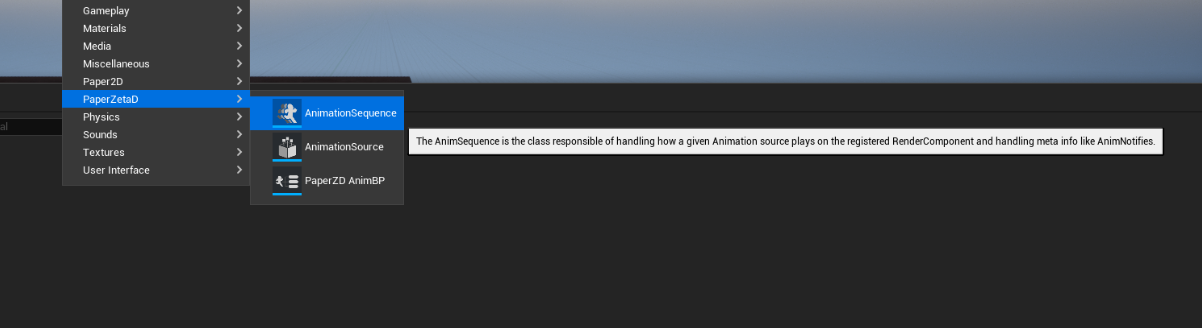
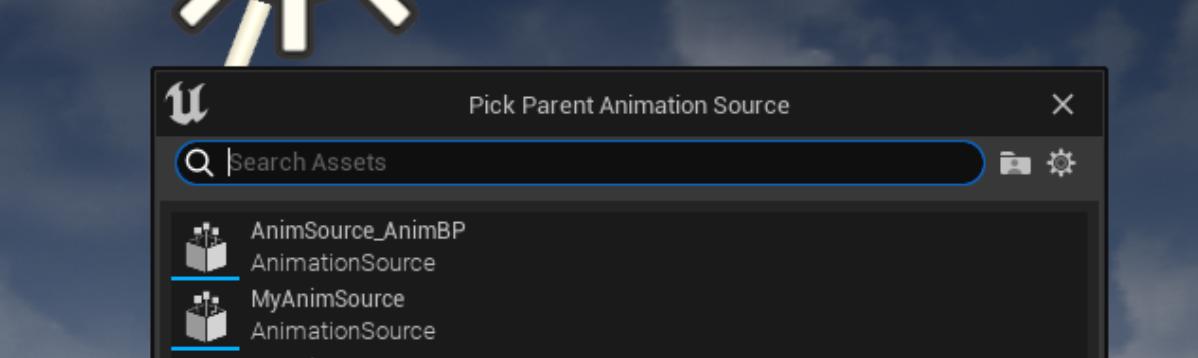
Note: If there aren’t any extra Animation Sources supported besides Paper2D Flipbooks, the system will now create a new asset, otherwise it will ask you to first identify which type of Animation Source you want to create.
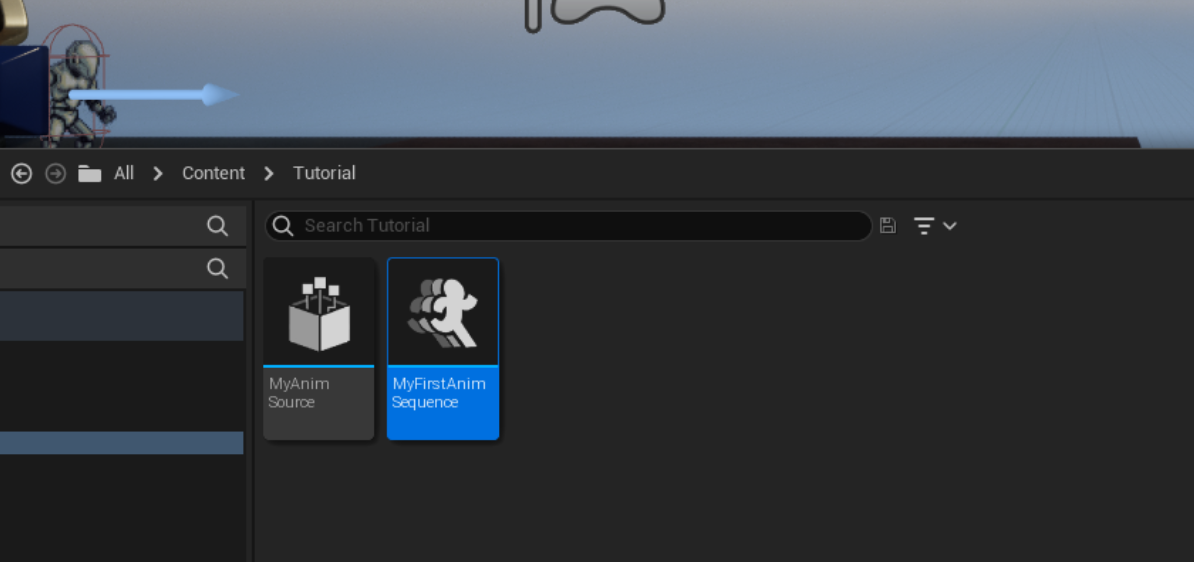
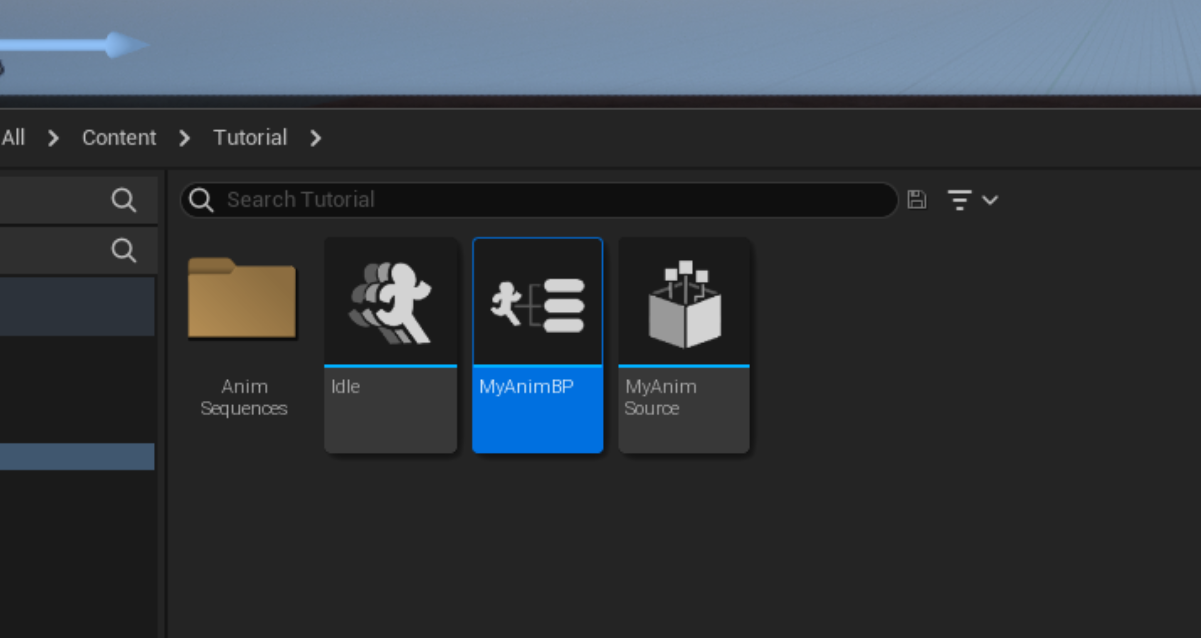
With the newly created Animation Source, which we named “MyAnimSource” we will begin the setup of the animations for our character.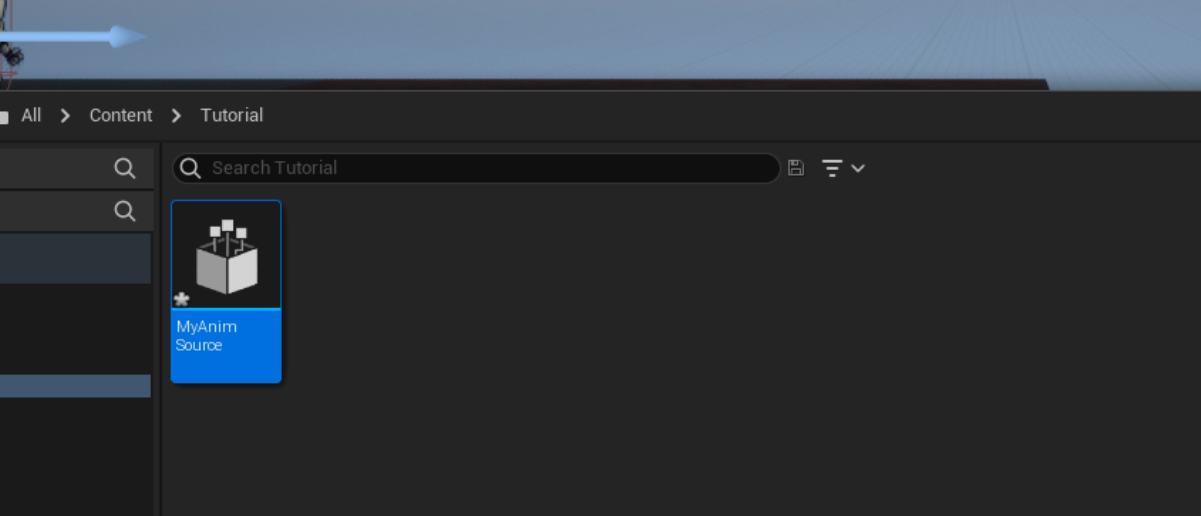
The AnimSequence is the object that contains the “Animation” to be rendered, and any metadata pertaining to events inside it (like AnimNotifies). AnimSequences live inside an “Animation Source” and thus, we need to specify one when creating a new Animation Sequence.
One can create a new Animation Sequence either by right clicking on the content browser and selecting from the drop-down, like in the previous step, or inside the “Animation Source Editor”.
When creating an AnimSequence from the drop-down the system will ask the user to specify to which Source this sequence should be attached. The type of the AnimSequence to be created depends on the Animation Source you select, selecting an Animation Source for Paper2D Flipbooks will create a specialized AnimSequence for them, the user doesn’t need to worry about it.
We’ll call this AnimSequence “MyFirstAnimSequence”
After that, double click on either your Animation Source or your AnimSequence, to enter the Animation Editor.
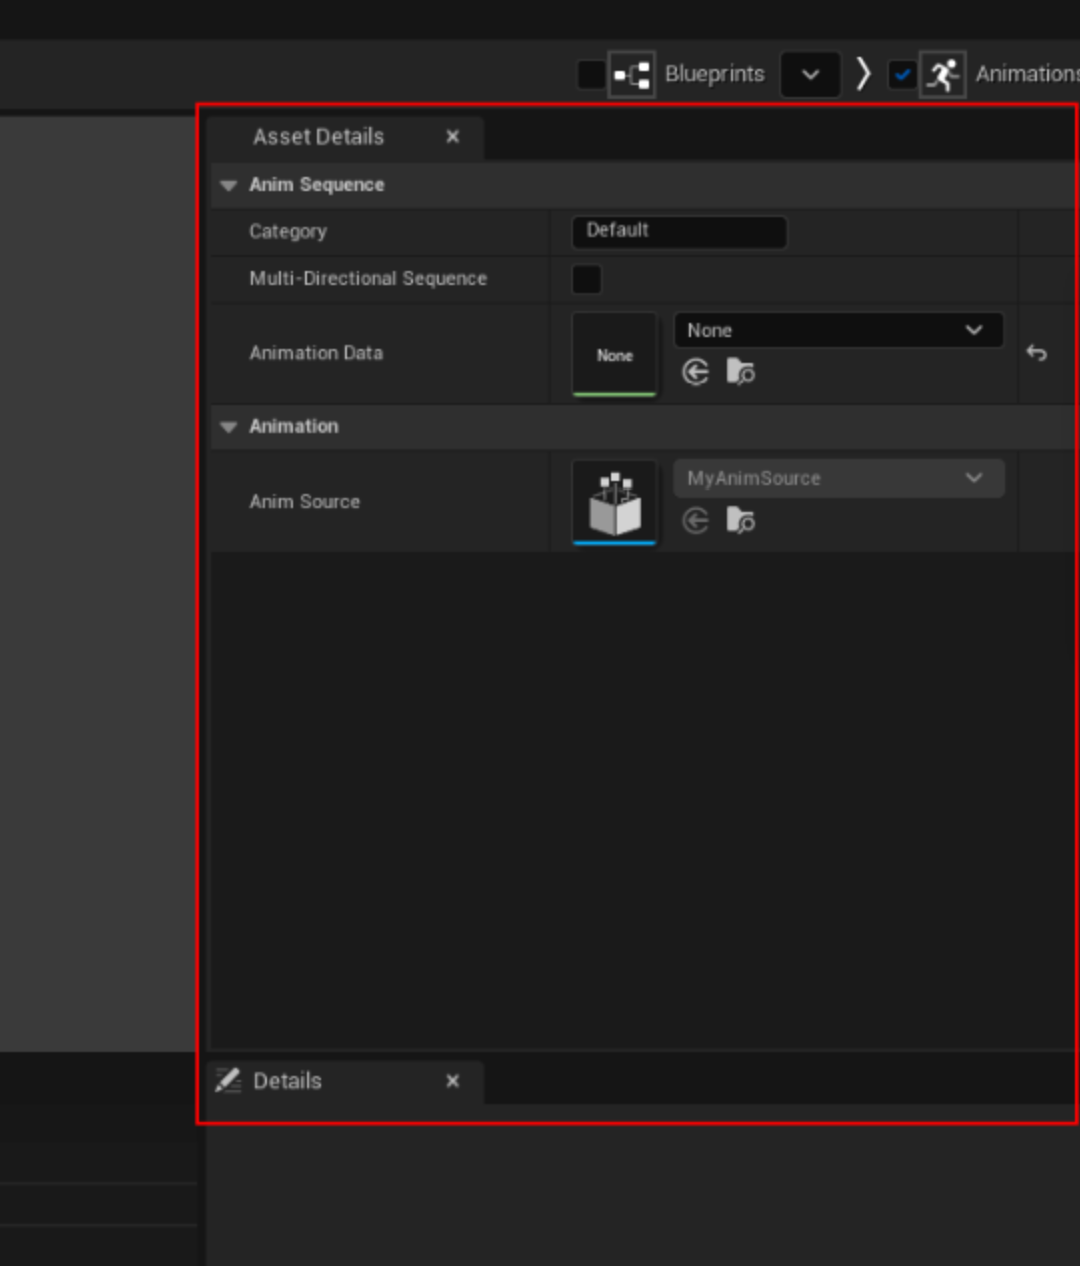
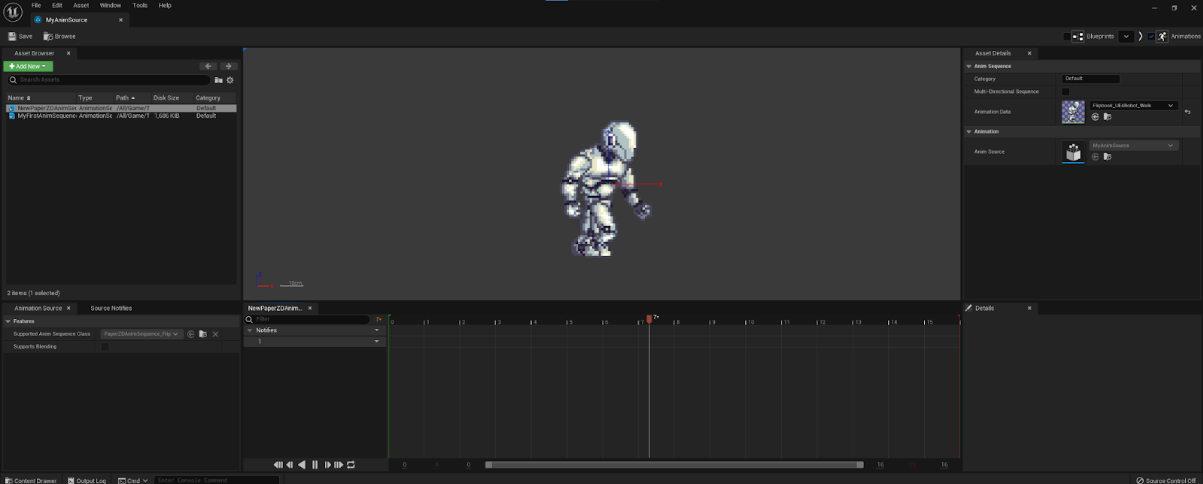
When first opening the asset, you’ll find yourself with the following view:
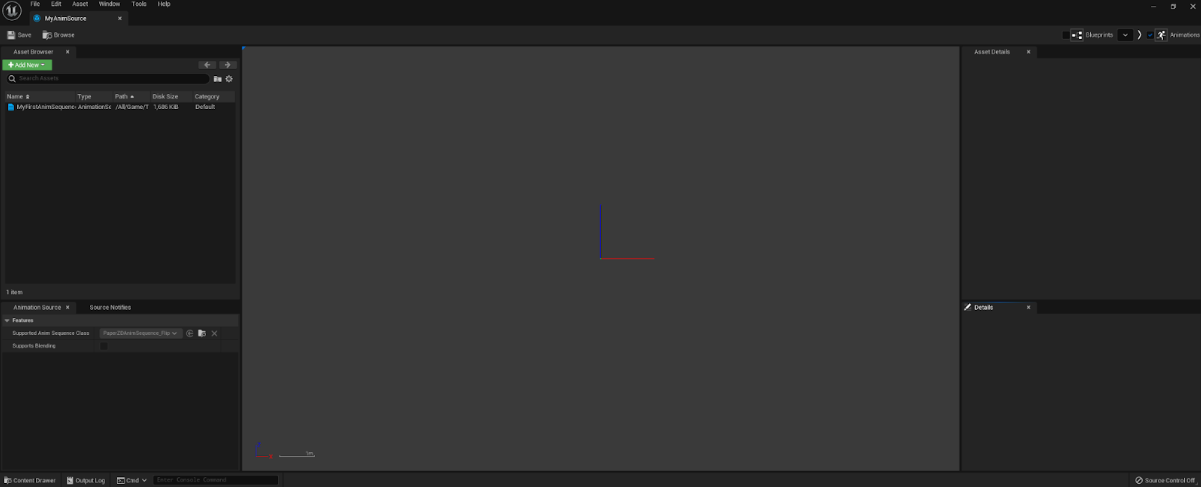
To the left, an asset browser will display all the AnimSequences that are currently parented to this Animation Source, a single one should be displayed if you proceeded with the creation of your first AnimSequence in the previous step

Clicking on this Animation Sequence will open the asset for edition, you should see a new tab appearing on the bottom-center part of the screen.
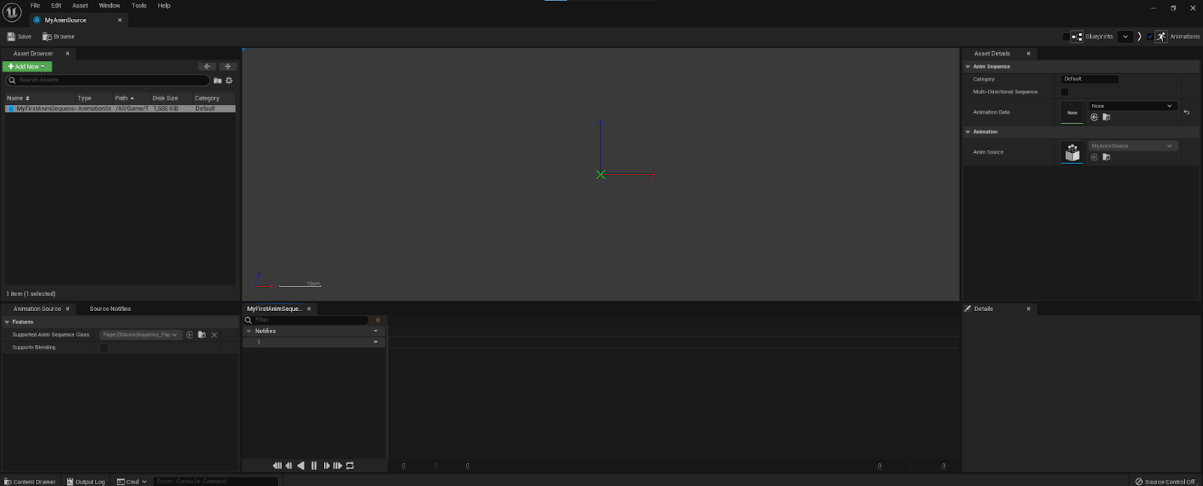
To the right side of the screen the “Asset Details” tab should also have been filled with the pertaining information of your AnimSequence.
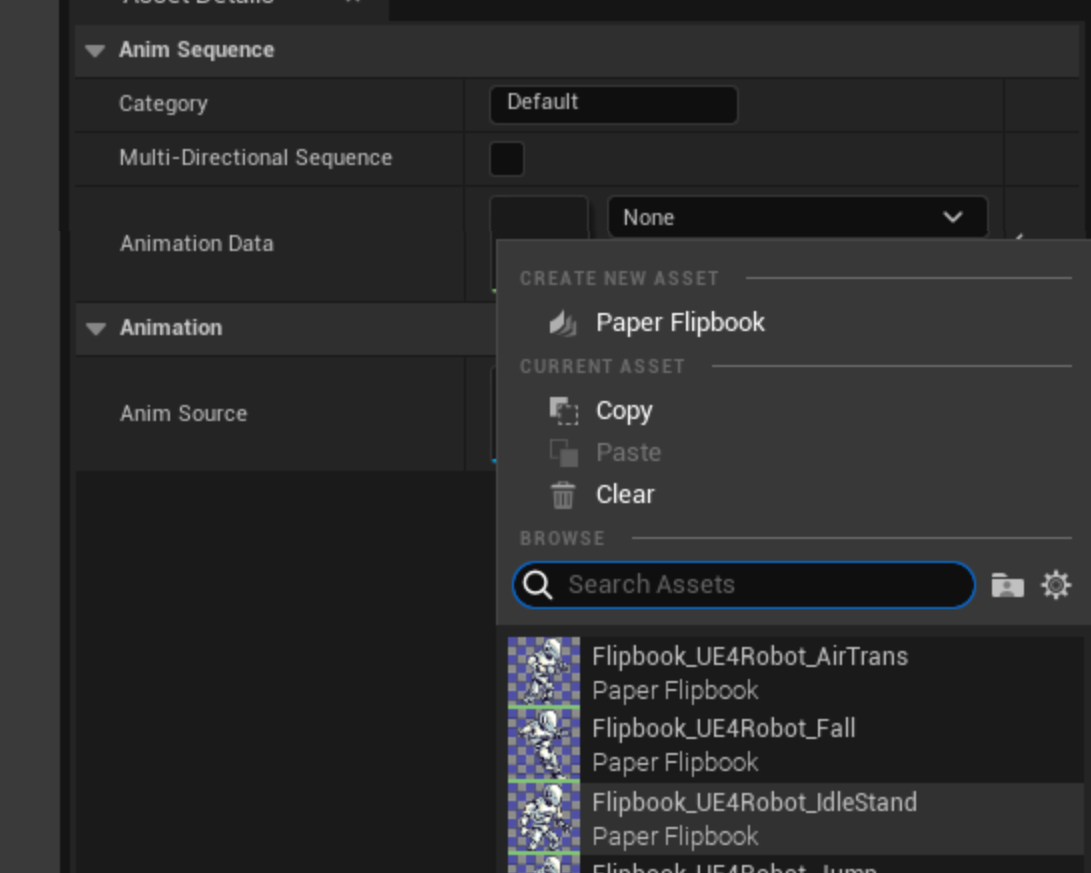
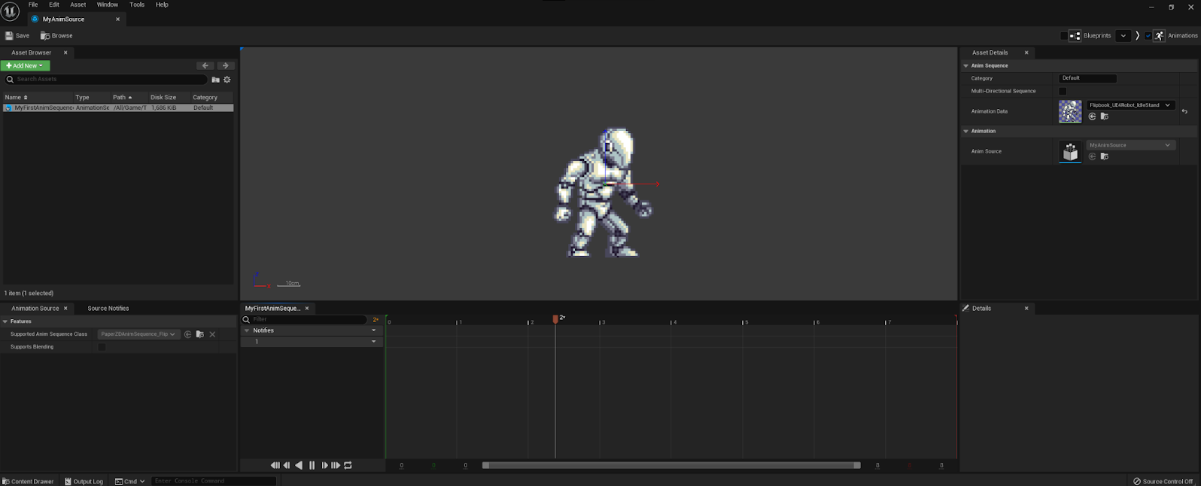
Now, let’s specify the Flipbook that we want to use for rendering this sequence, we’ll use the Paper2D example content project animations, and select the “Idle” animation. After we select the animation, the Viewport and Timeline on the center should reflect the newly created Animation
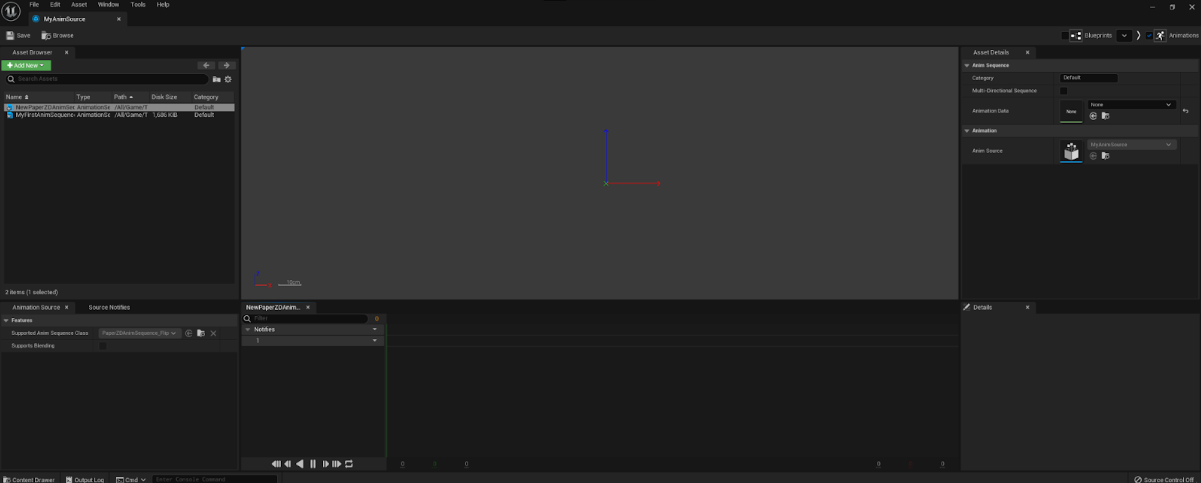
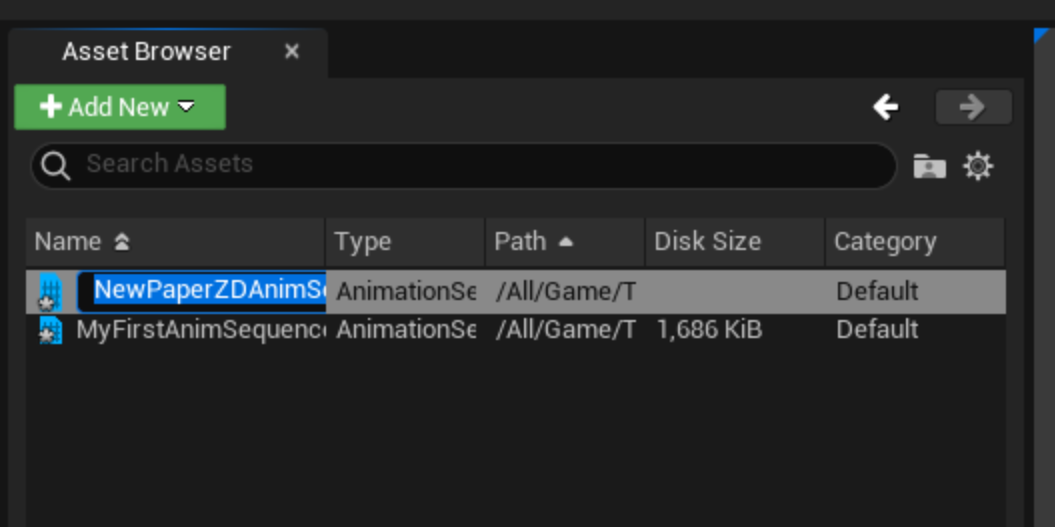
We now have a simple animation sequence setup, we can proceed and create another one for the “walking” behavior. Instead of creating it from the content browser, we can create one directly in this editor, by clicking on the “+Add New” button on top of the AnimSequence list.
This will create and select a new AnimSequence with a default new name
We can then set its Flipbook to be the “Walking” animation
NOTE: By default the AnimSequences created via this method are stored in a folder called “AnimSequences” which will be created on the same level as the Animation Source. This behavior can be changed in the “PaperZD Editor” section in the Project’s settings.
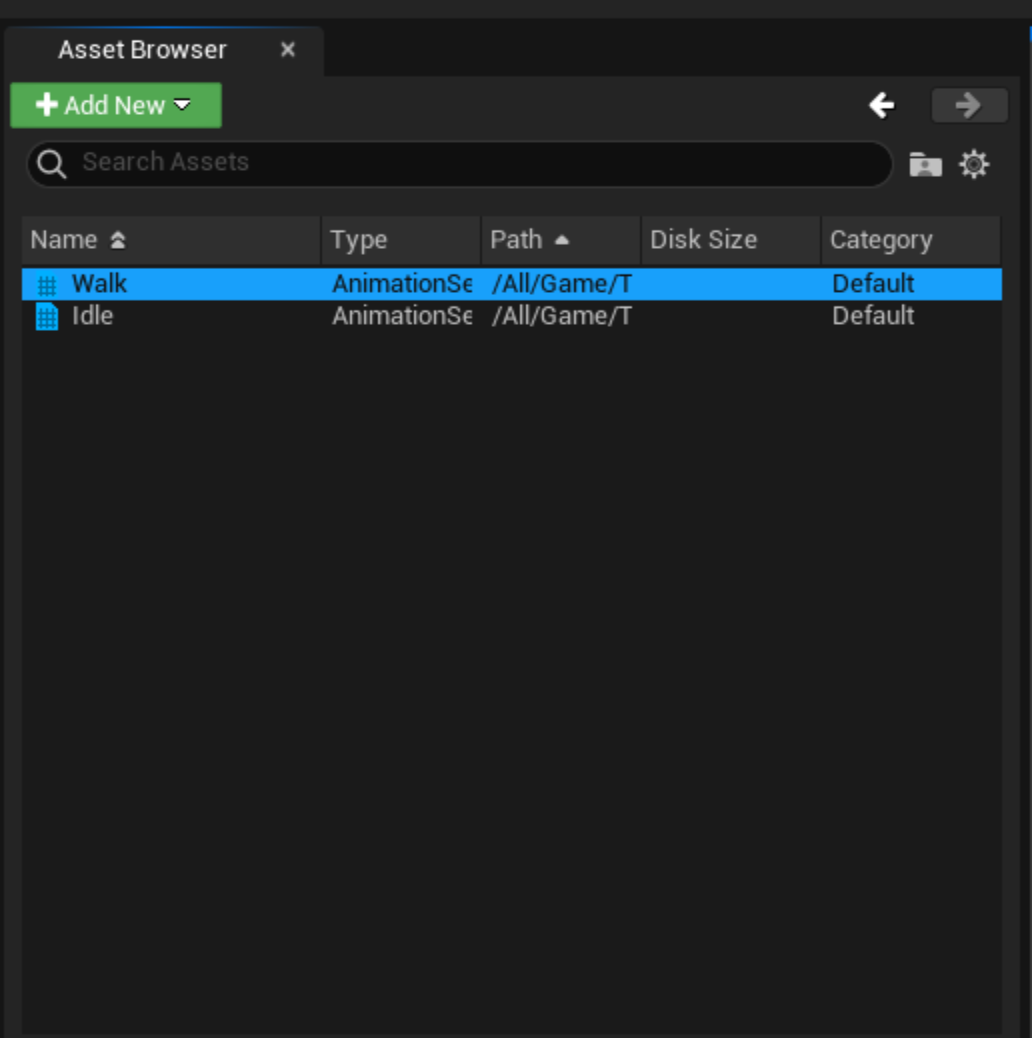
We can also proceed to rename our Animation Sequences with a more recognizable name, let’s call them “Idle” and “Walk” respectively. Renaming can be done in the Animation Editor by simply clicking the animation and pressing “F2”.
With this we have the backbone for creating our animation logic, while there are other things we can do in this part of the editor, we’ll get back to those in later chapters.
For now, we will create our Animation Logic, by creating a new Animation Blueprint that uses our Animation Source as base. As always, right click on your content browser, and select the following option (when prompted, choose your Animation Source as base).
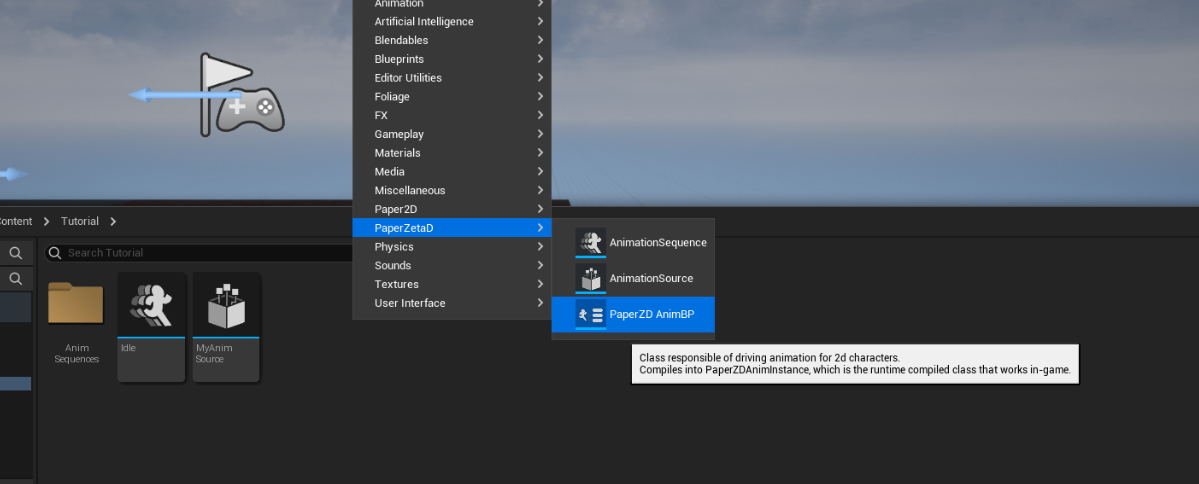
We’ll call it “MyAnimBP”
This asset will open the “Animation Blueprint Editor”
When opening the Animation Blueprint Editor for the first time, you’ll see a familiar Blueprint Editor window, with an Event Graph and an added “Animation Graph”
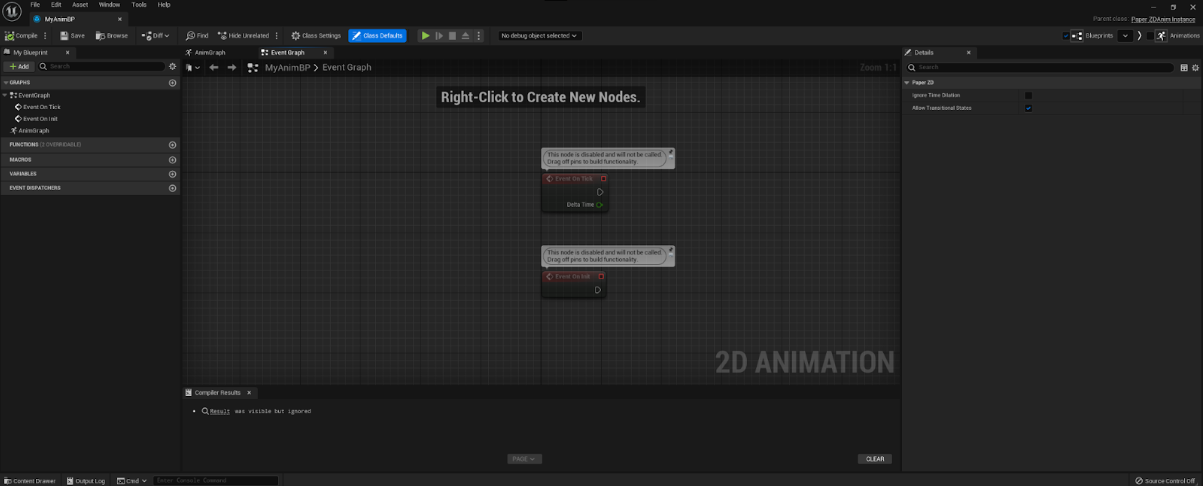
Double clicking the Animation Graph enables you to modify the logic that the blueprint will follow to render the final animation.

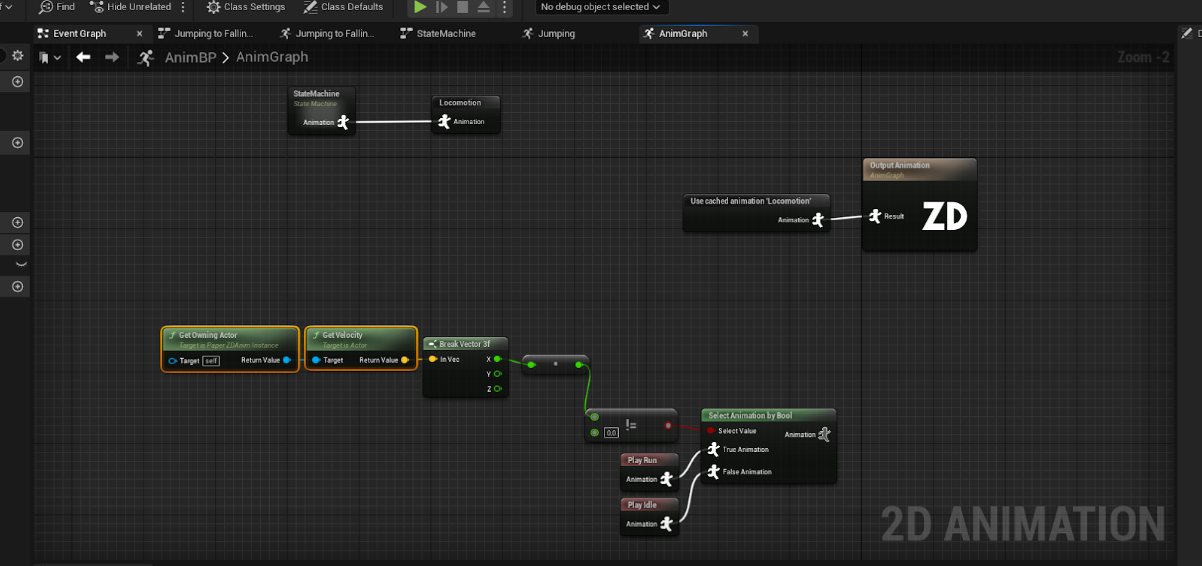
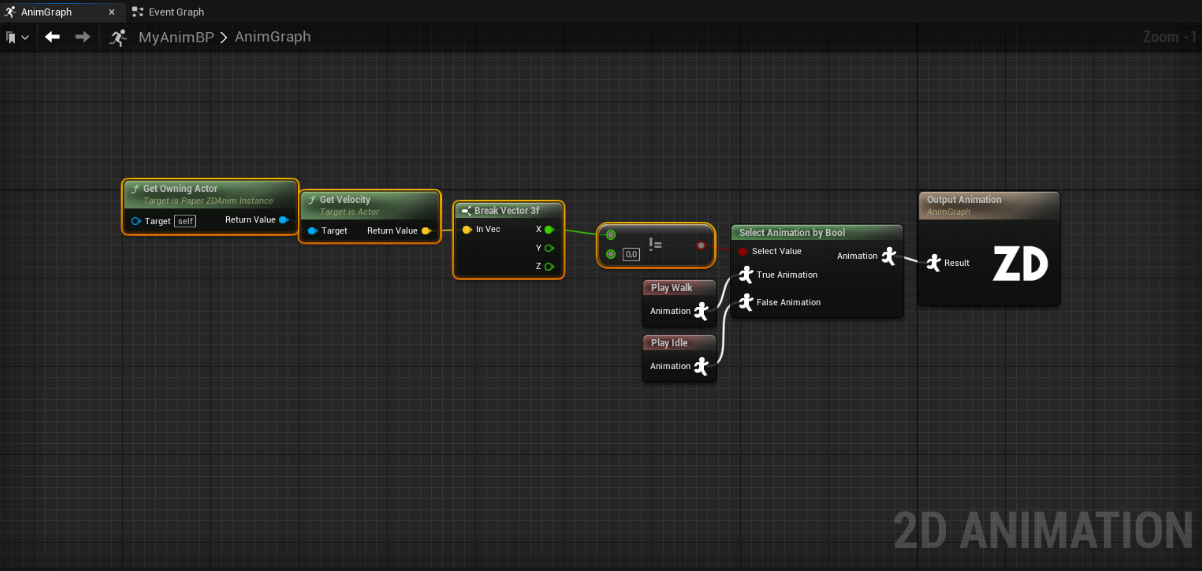
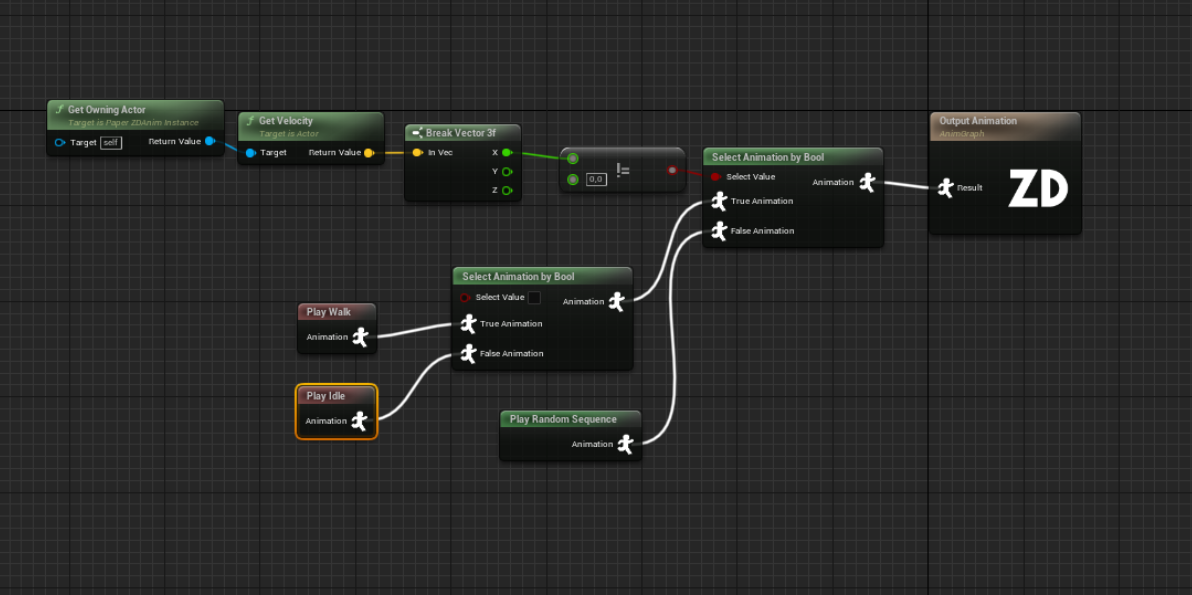
As a simple approach, we will use a “Select” node to switch between our two already created animations, depending on the velocity of the Character, displaying the Walk animation when moving and the Idle animation when not.
Other nodes can also be used to specify more complex behavior, like using animation state machines. Those we’ll be explained in later chapters.
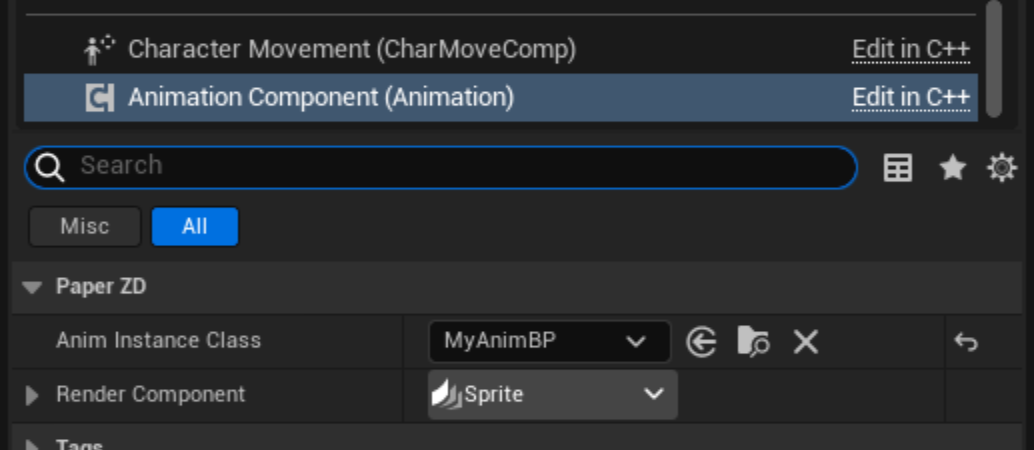
With the animation logic created, we need to now specify that we want to use it with our character, for this PaperZD comes with a “PaperZDAnimationComponent” that can be added to any Class/Object to drive their animations.
The Animation Component requires the following data to be set to ensure correct behavior.
Note: The RenderComponent should be compatible with the AnimationBlueprint that you specified.
For default Paper2D characters, PaperZD comes with a PaperZDCharacter that already sets up the RenderComponent to the main PaperFlipbook. If your goal is to create a simple Paper2D character, then inheriting from this class is a good option.
For example purposes, we’ll grab a default PaperZD Character and create a subclass of it. The character will simply route the Left/Right inputs
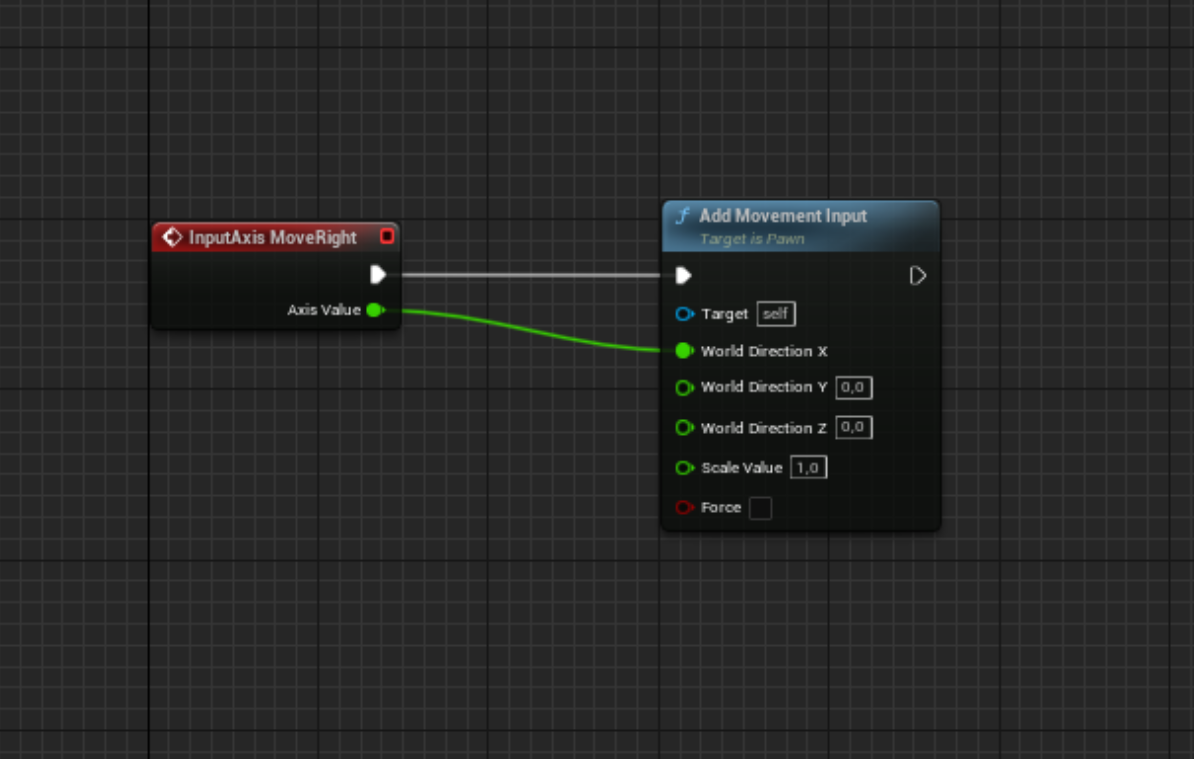
and we’ll set the AnimInstanceClass to point to our created Animation Blueprint.
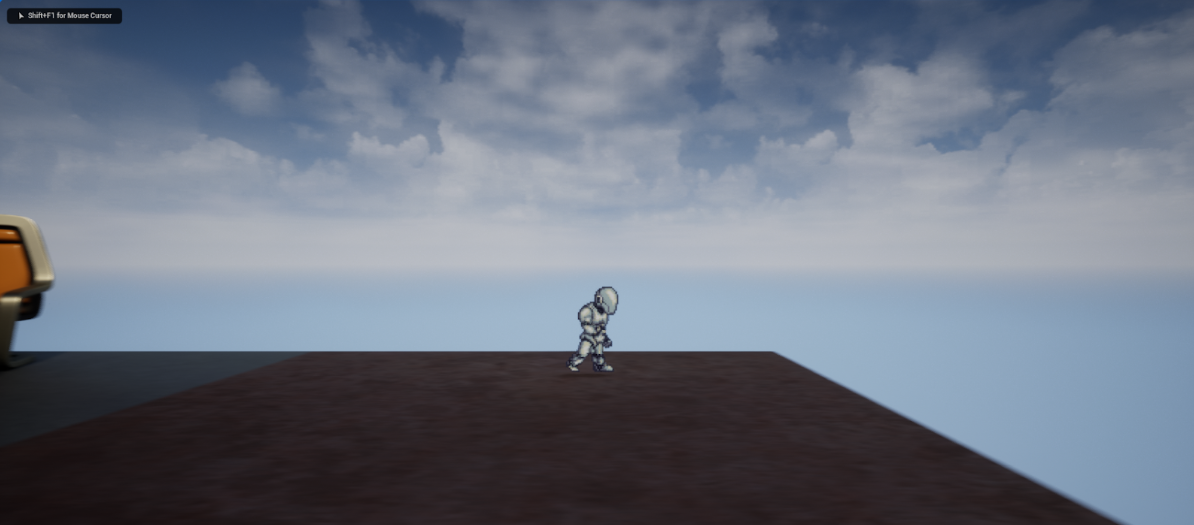
If we now hit play, we should be able to see the animation changing between walk/Idle when moving and standing still.
For having rich animations, you not only need to be able to correctly display the animation in the correct time and situation (which we accomplished by using the Animation Blueprint), but you also need to be able to play effects, trigger events and play sounds at very precise timings.
For this, PaperZD comes with its own “AnimNotify” system, similar to the one that comes with the Engine.
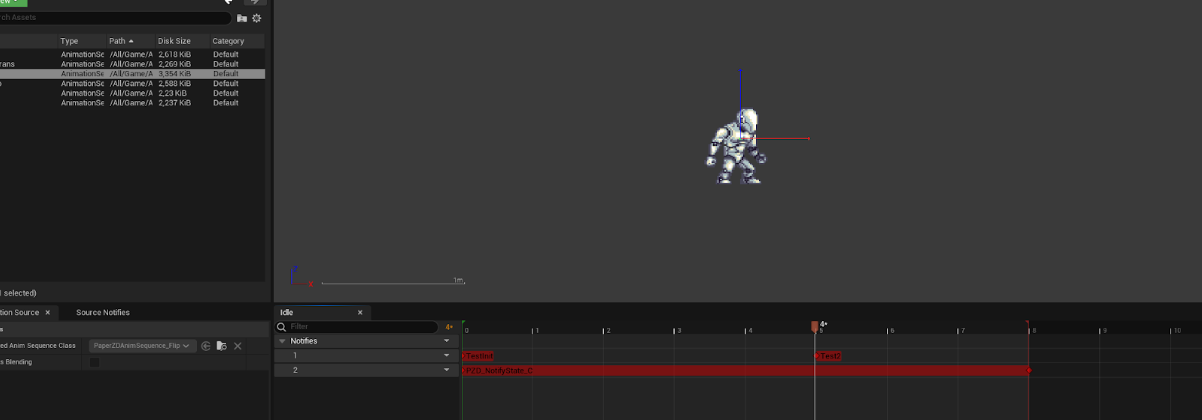
Opening the “Walk” animation sequence should display the animation editor that we used previously, below the viewport, there’s a “Timeline” that we can use for setting up events.
In this timeline, you can add as many AnimNotifies and NotifyStates as you want. The plugin comes with some default ones, but you can always create custom Blueprint and C++ subclasses to create your own behavior.
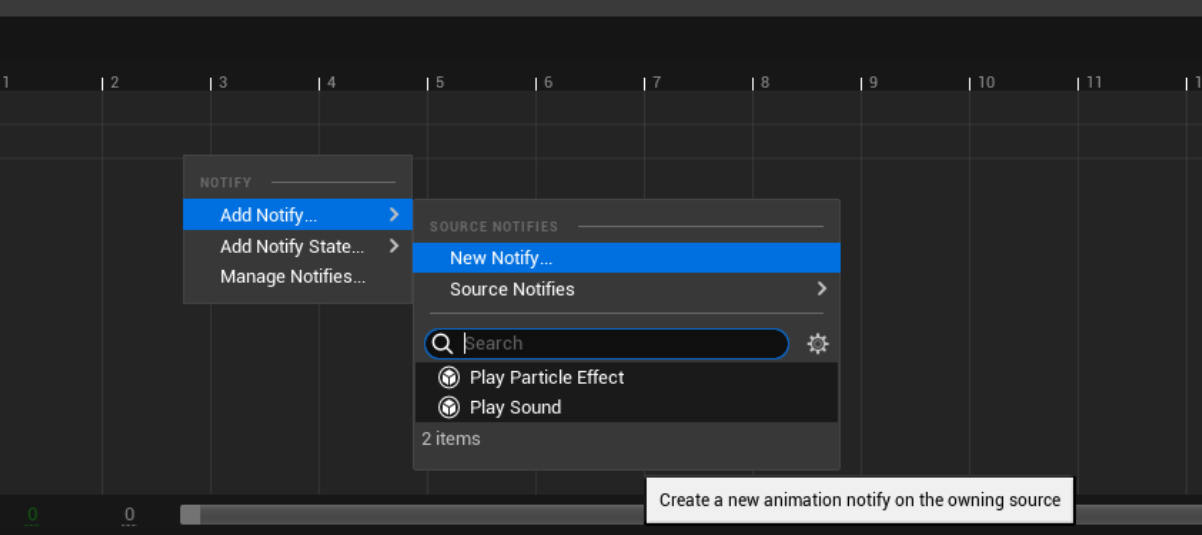
For illustrating the point, we’ll create a “Source AnimNotify”, which is a type of Notify that lives inside the AnimationSource and it can be implemented by any Animation Blueprint that inherits from this source.
Right click on the timeline, and click NewNotify, filling the name when prompted, let’s call it “Footstep”
We’ll move it to the correct place (just when the foot hits the floor) and then we’ll create another Footstep notify, by selecting from the already created ones.
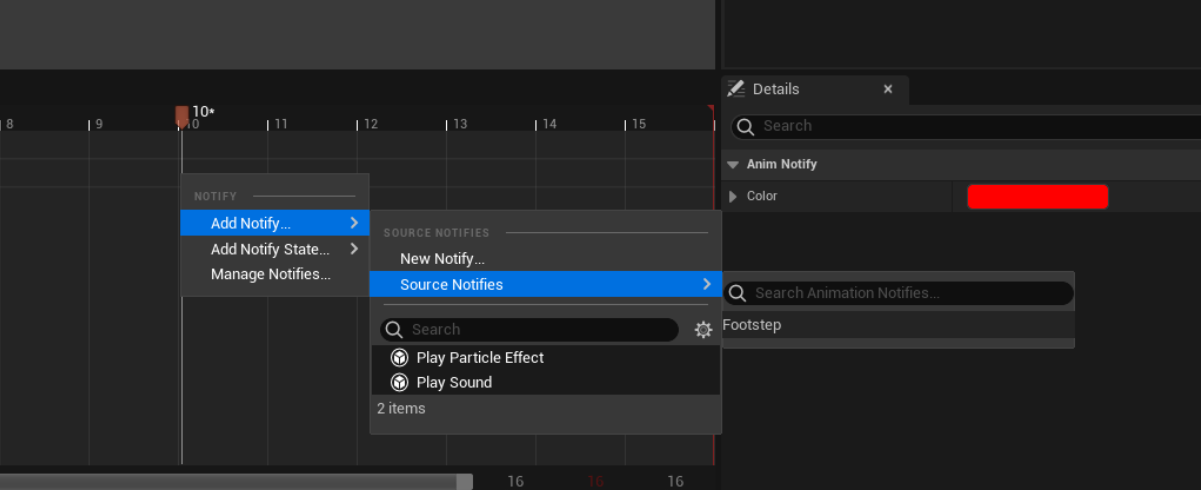
The timeline should look like this:
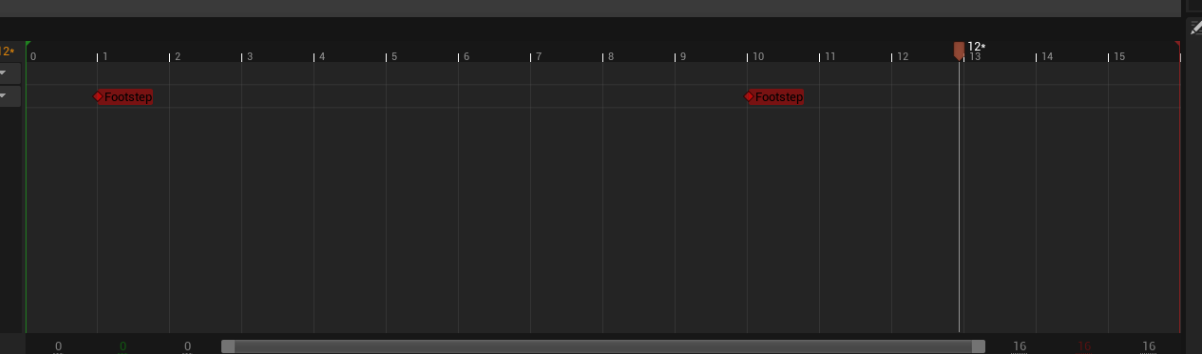
Normally, just setting the notify and correctly configuring it would be enough, but Source Notifies need to be implemented by the Animation Blueprints that derive from this Source.
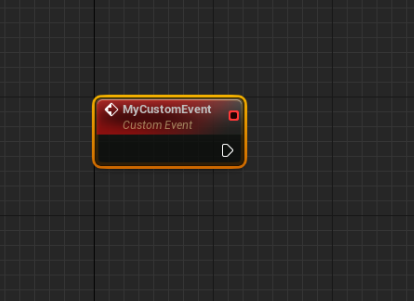
If we go back to our Animation Blueprint, by simply clicking the top-right selector hotlink, we will see that the Animation Blueprint has automatically created a new function for us.
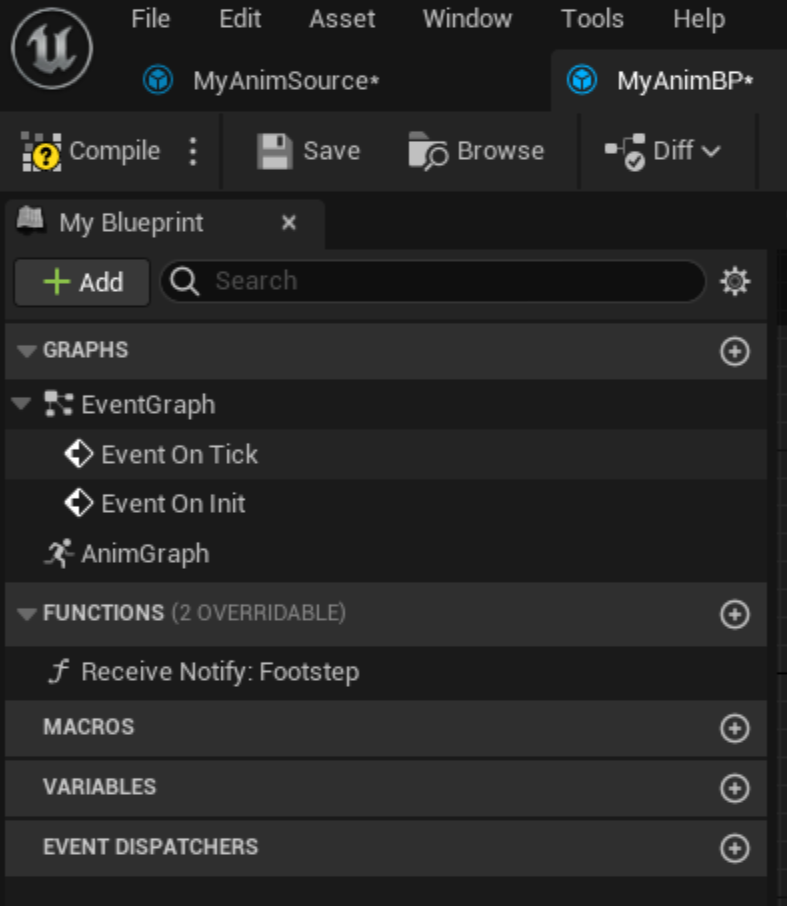
Source Notify Functions will automatically be created on every child Animation Blueprint and they will all share the same naming convention: Receive Notify: .
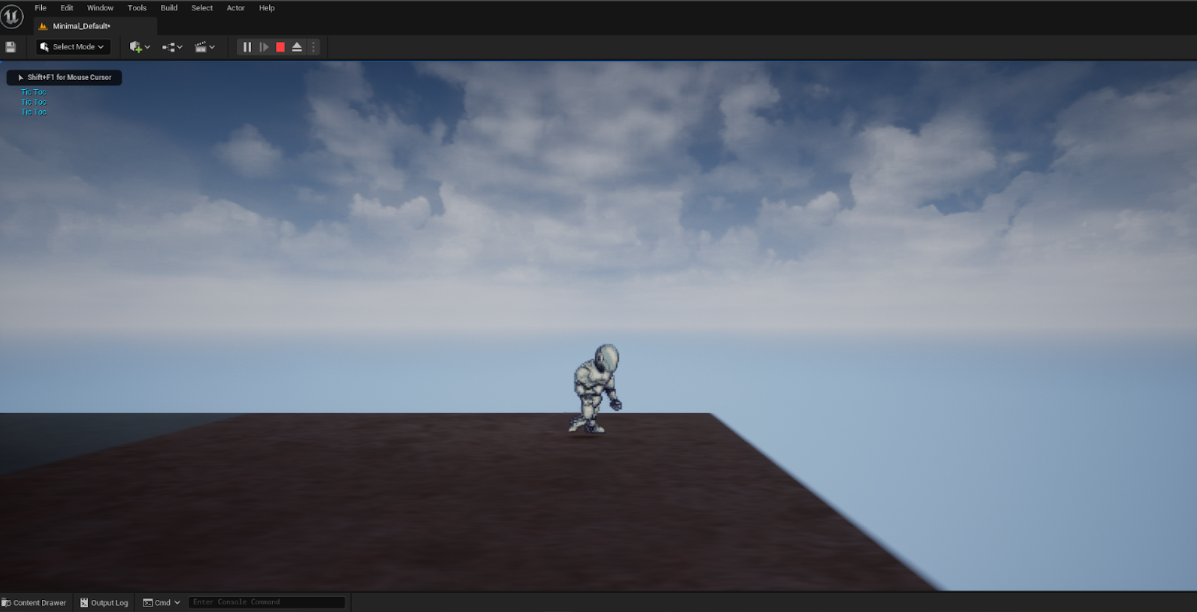
We’ll simply double click on this function and put some really simple behavior for now.
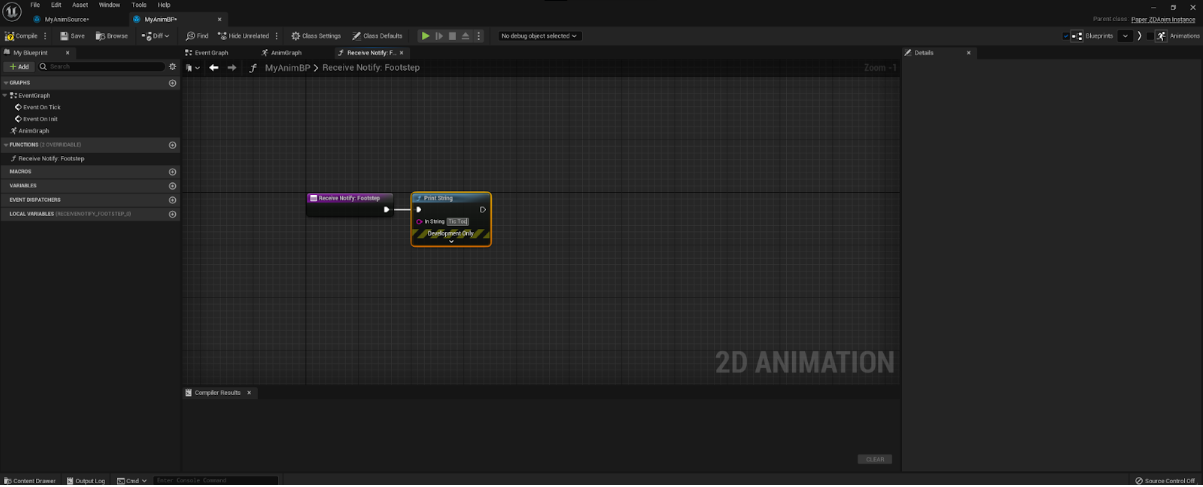
If we compile and play, we should be able to see the behavior being triggered at the correct times.
The animation graph comes with a set of “Animation Nodes”, that tell the system which animation it should use at a specific time. In previous chapters we’ve used the “Select Animation by Bool” to select between two outputs depending on a boolean value.
An important note is that the “Animation Pin” that goes inside the node (drawn like a papercut character), can be the output of any Animation node, these nodes can be concatenated to create complex behavior and switch between nodes.
An example follows:
The output of an animation node can only be connected to a single animation pin, this is to ensure that the “Update” sequence runs as intended and doesn’t trigger multiple times. If you want to use the output of the same node multiple times (like using a state machine in different places), you’ll need to use the “CacheAnimation” node as follows.

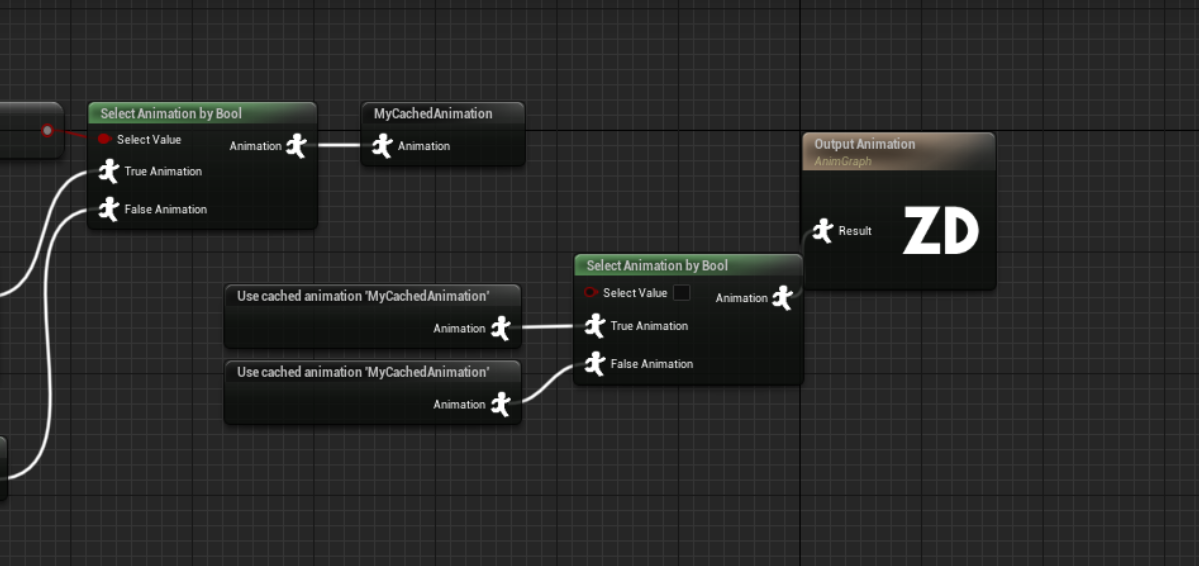
This example is illustrative, the same output can be used as many times as needed, as we are only obtaining the cached version of it and only updating it once.
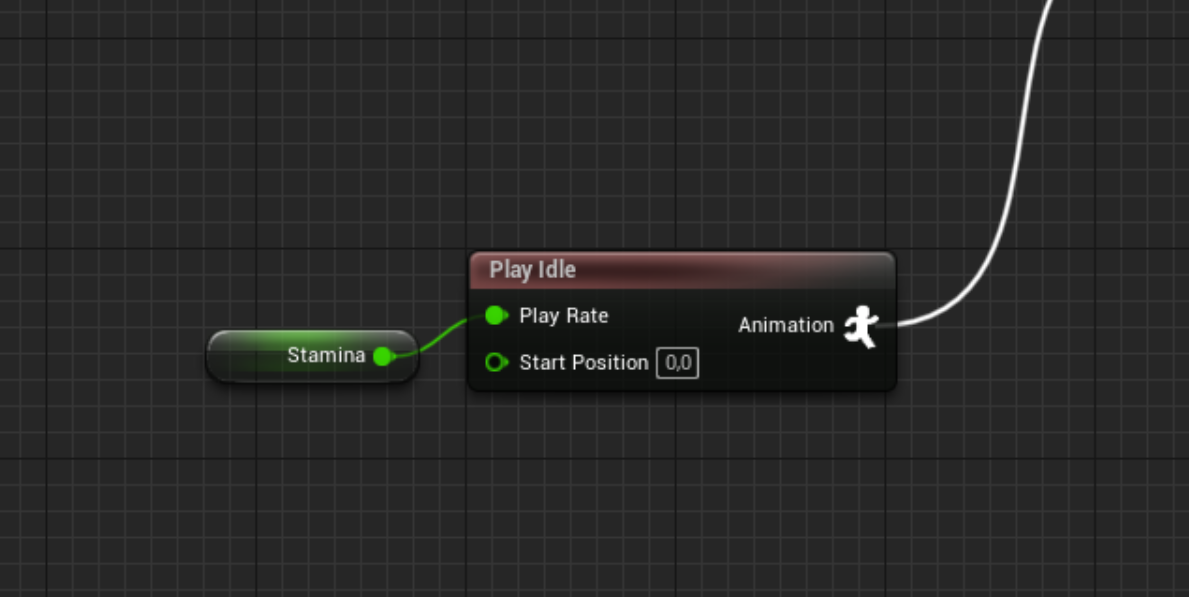
Another point of interest is that each animation node has settings that can be changed to modify how they behave, let’s take the “Play Idle” node as an example.
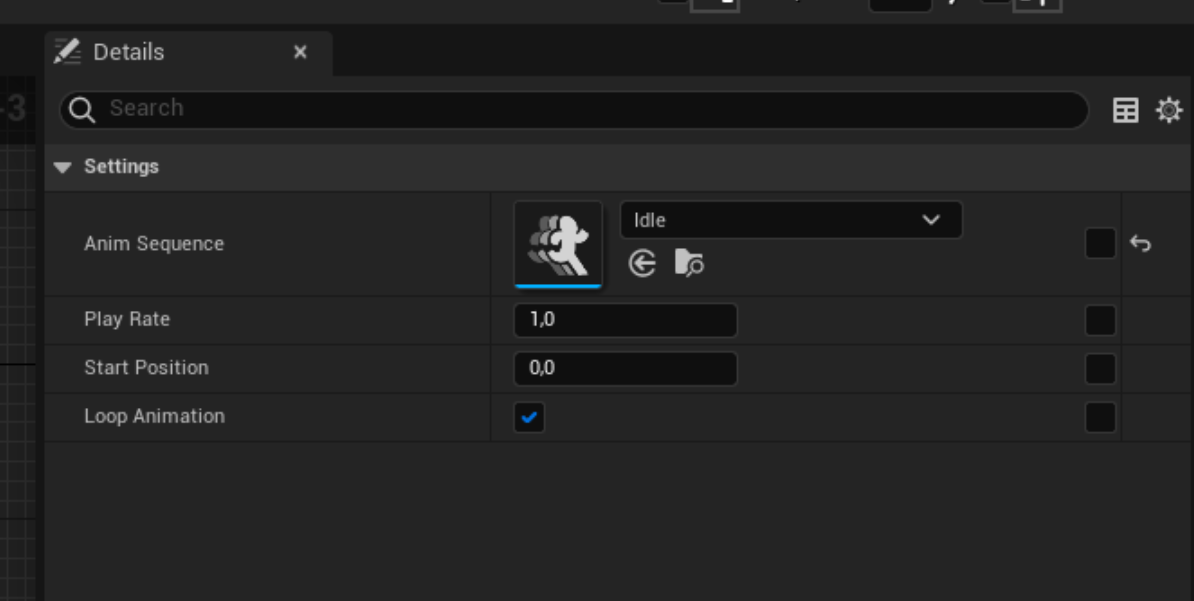
You can see that you can actually change different values like the PlayRate, whether to start the animation from the beginning or another playback position and even if we should loop the animation. This variables can actually be made “dynamic” by selecting on the checkbox that is to the right, which will create a new PIN on the node, which you can then bind to dynamic variables and logic into the Animation Graph

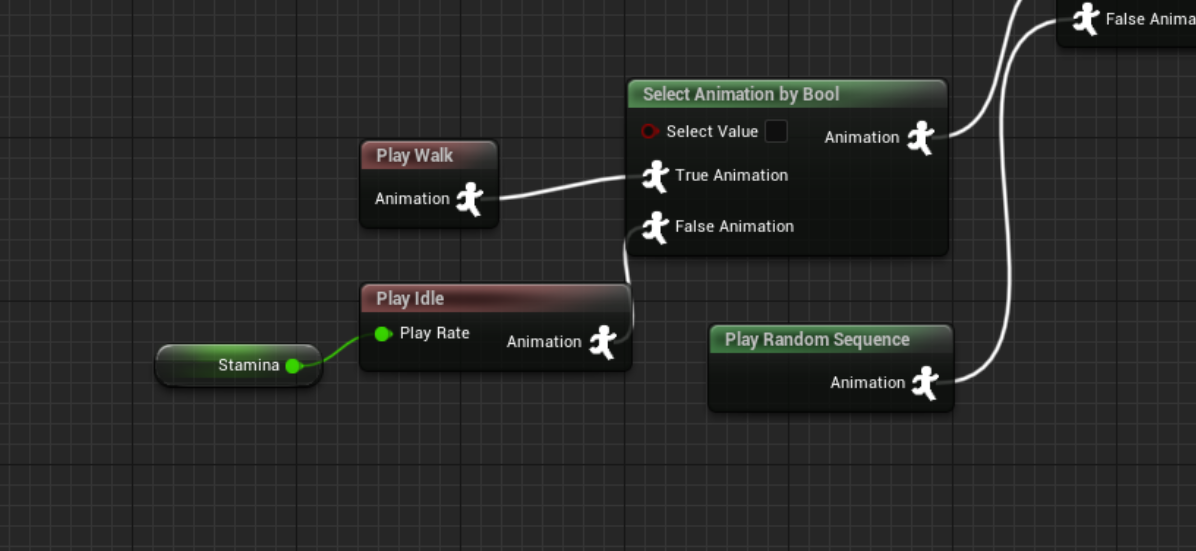
In this specific case, we could change how quick the Idle animation would play, and make it run slower if the character is tired or even pause it entirely.
There are multiple nodes and settings, to ensure the animations work as intended with the least amount of code as possible.
In previous chapters we created a very simple 2 state animation character that simply switched between animations depending on its velocity. While this was easy to follow, it doesn’t scale well and the more the character increases in size, the more complex the animation logic becomes.
For these instances, PaperZD comes with a custom StateMachine node that is optimized for 2D usage. Let’s improve our walking character and migrate the logic into a new state machine.
First, we’ll create a new StateMachine node on the Animation Graph, we’ll call it “Locomotion” for the purpose of this example.
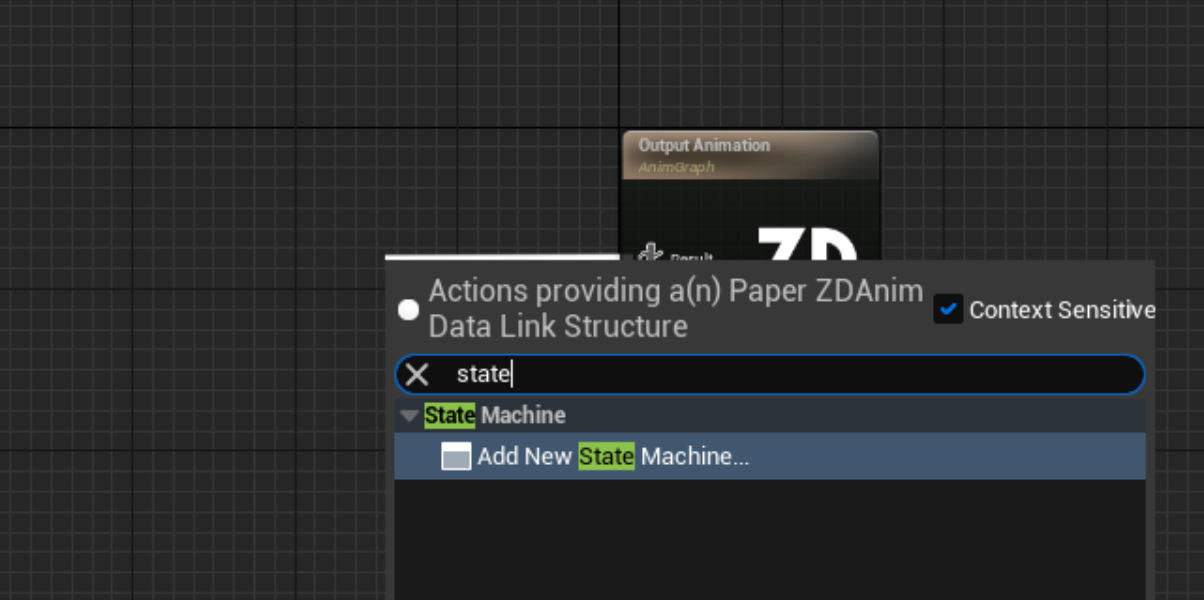
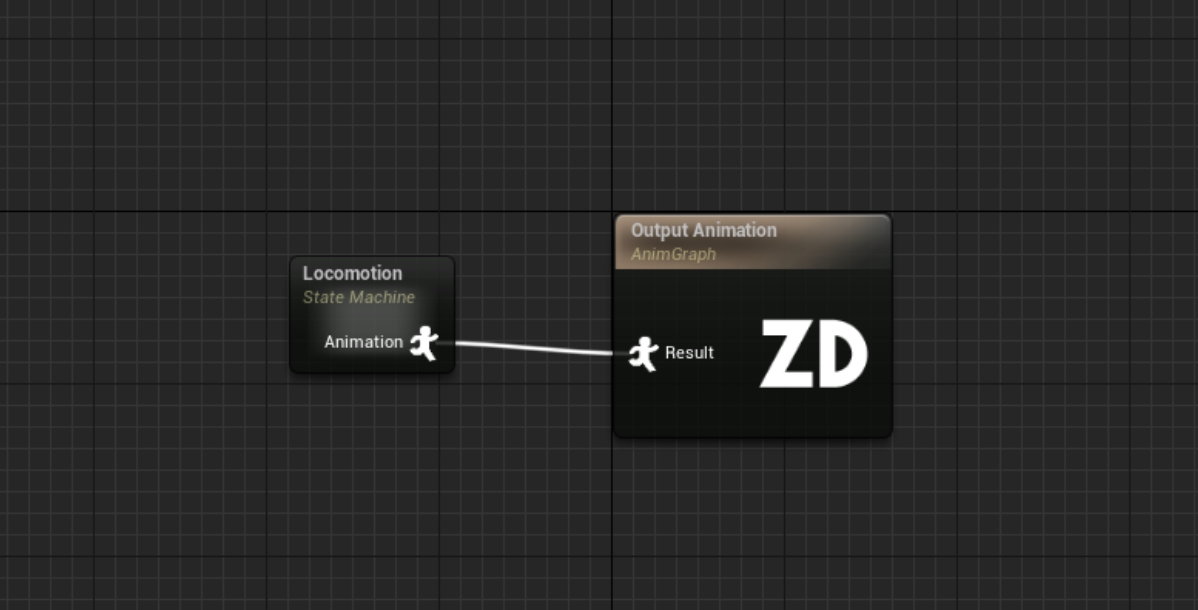
Note: As any other Animation Node, the state machine can be outputted to any other node and concatenated as we did in the previous chapter.
Double clicking the state machine allows us to modify its underlying graph, inside of it we’ll find a single “Out” node, that serves as the root of the state machine, from here we can start building our logic.
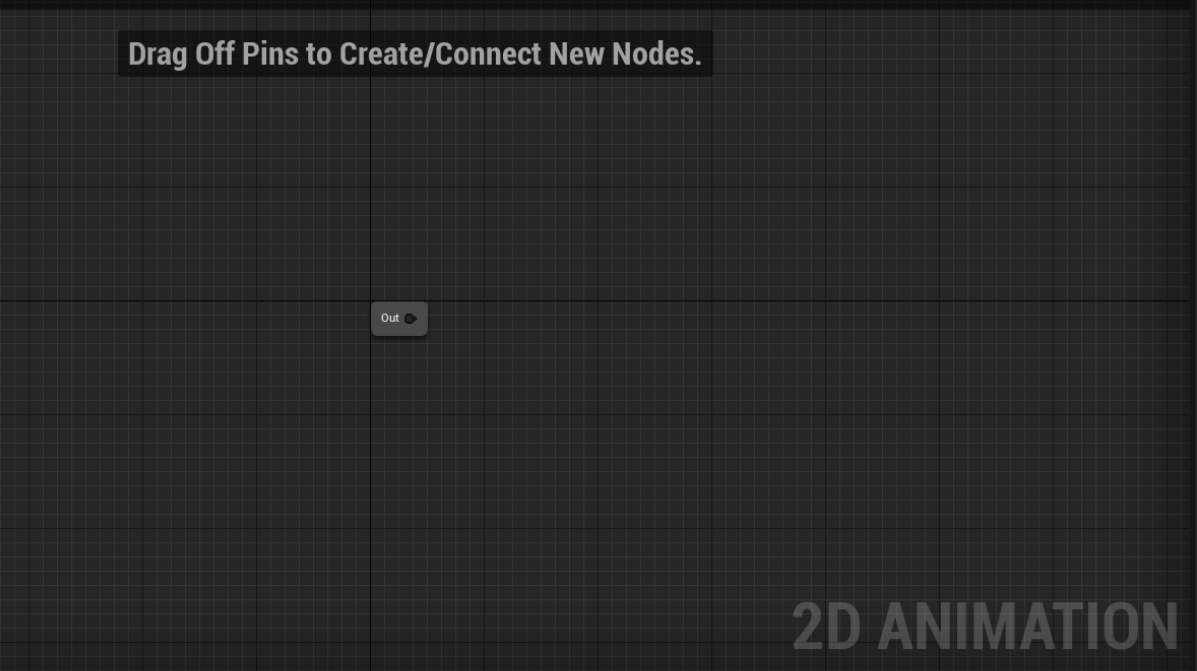
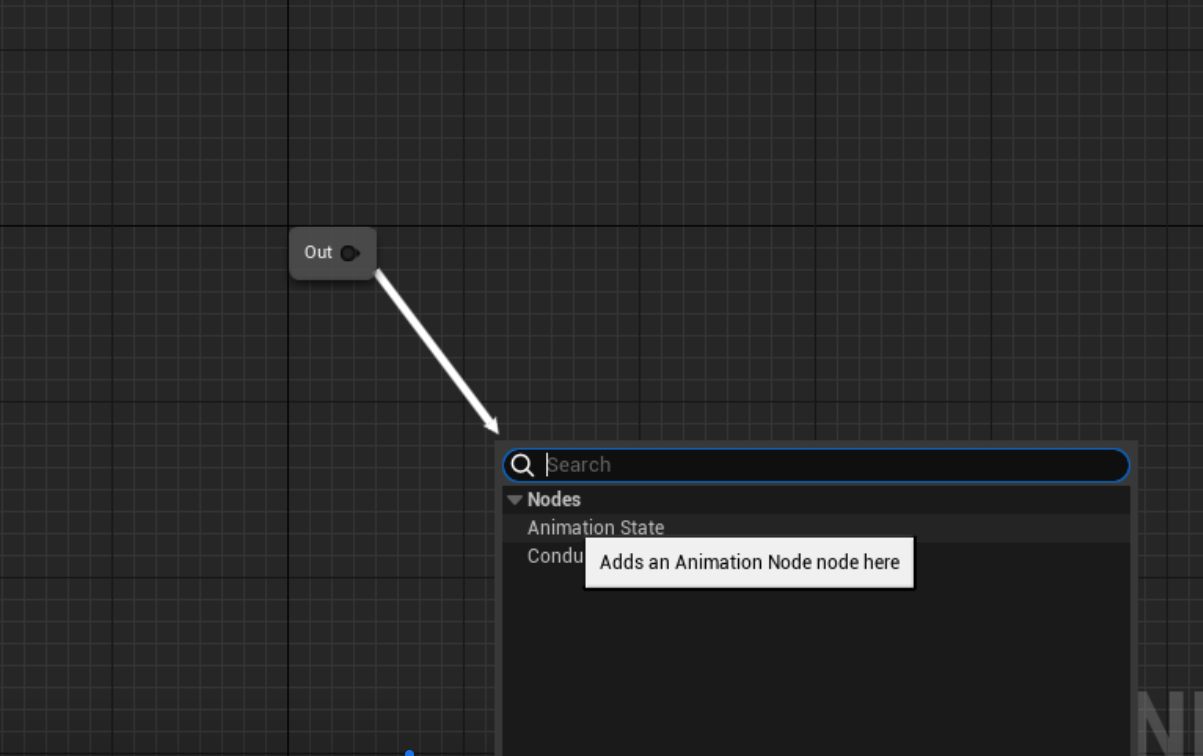
We will recreate the logic of the previous chapters first, for this we’ll drag from the Out node and put a “State”, this will be our Idle.

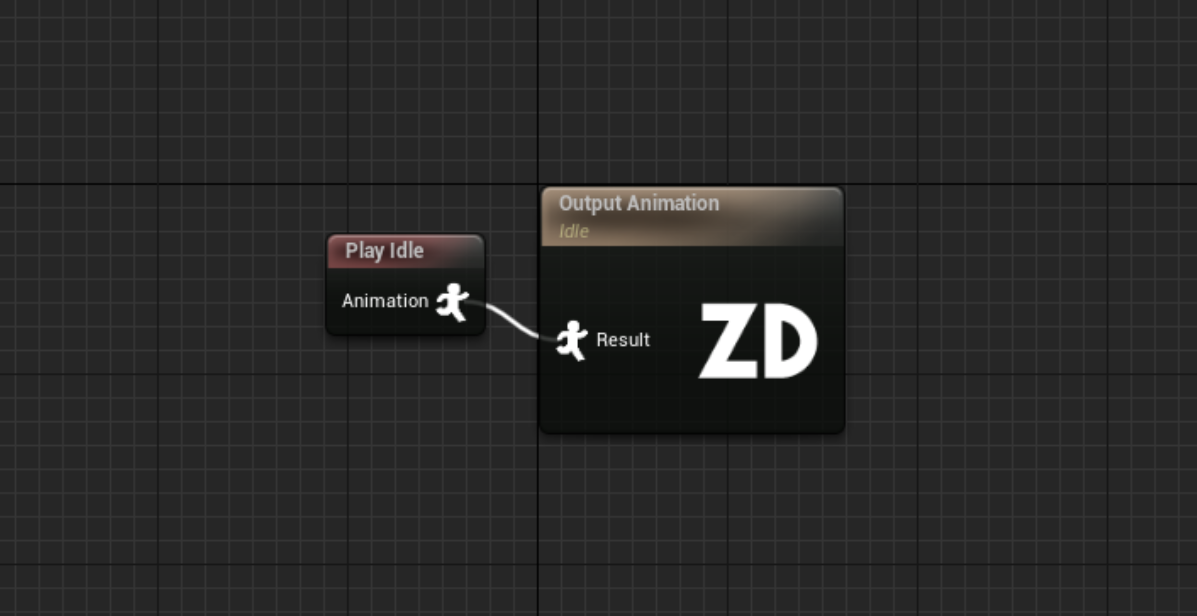
Double clicking on the state we’ll bring us to the state’s internal animation graph, which works just like the root graph we’ve been using; here we’ll simply put a “Play Idle” node.
After that, exiting this animation graph back to the state machine, we’ll dragon from the edges of the state and create another State, we’ll call it Walking.
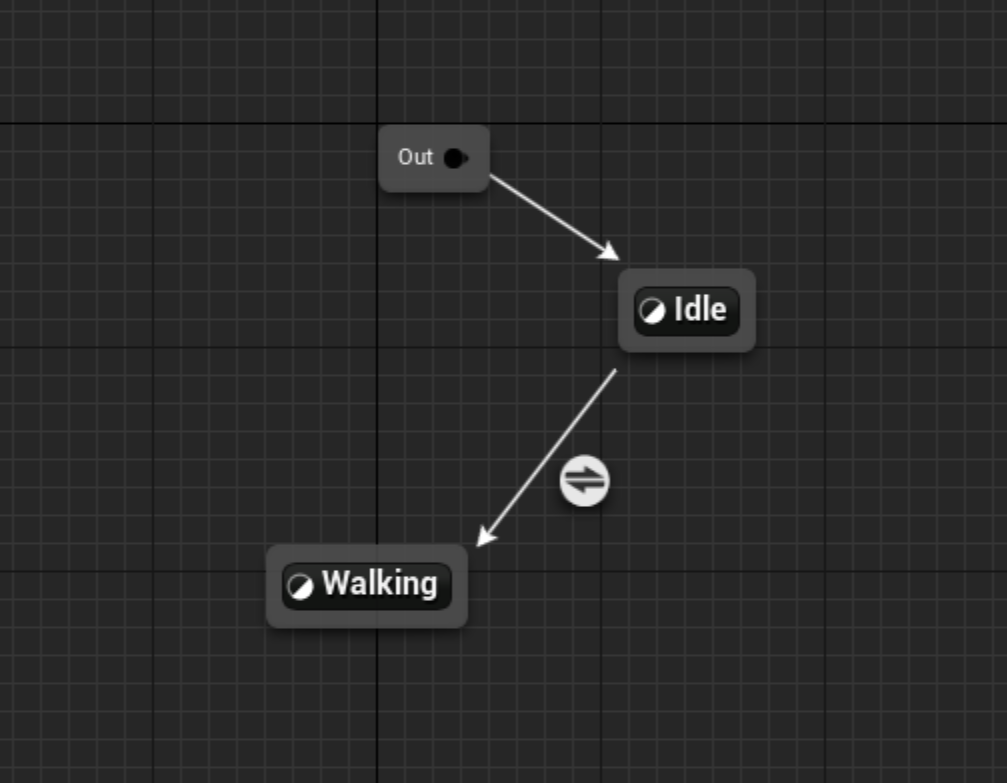
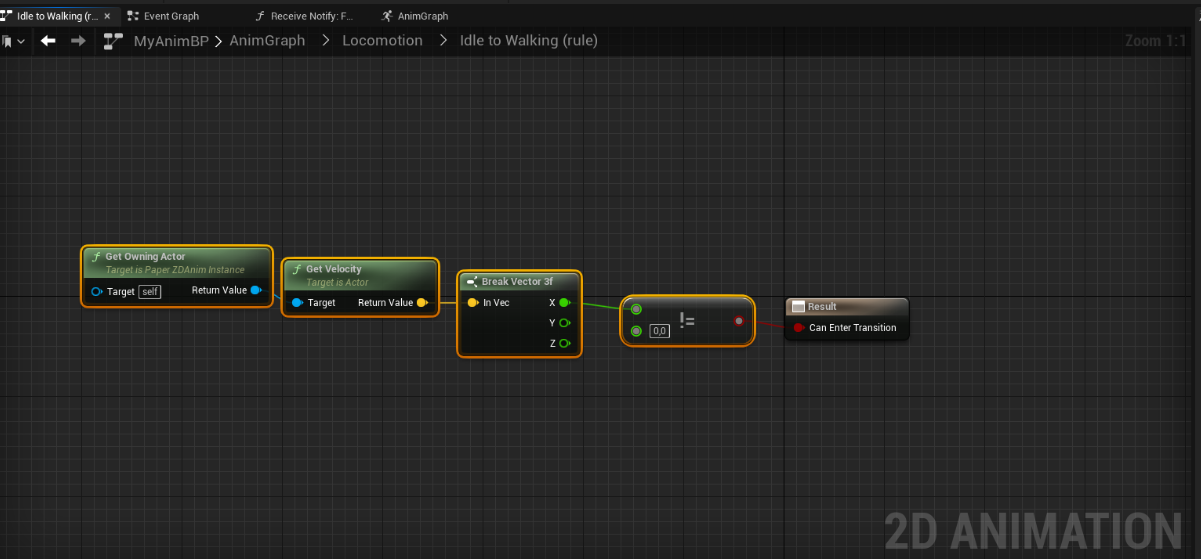
As you can see, an intermediate node has also been created, this is the Transition that will govern the logic that will trigger the state traversal from Idle to Walking. We’ll double click here and put the same logic we had on the previous example.
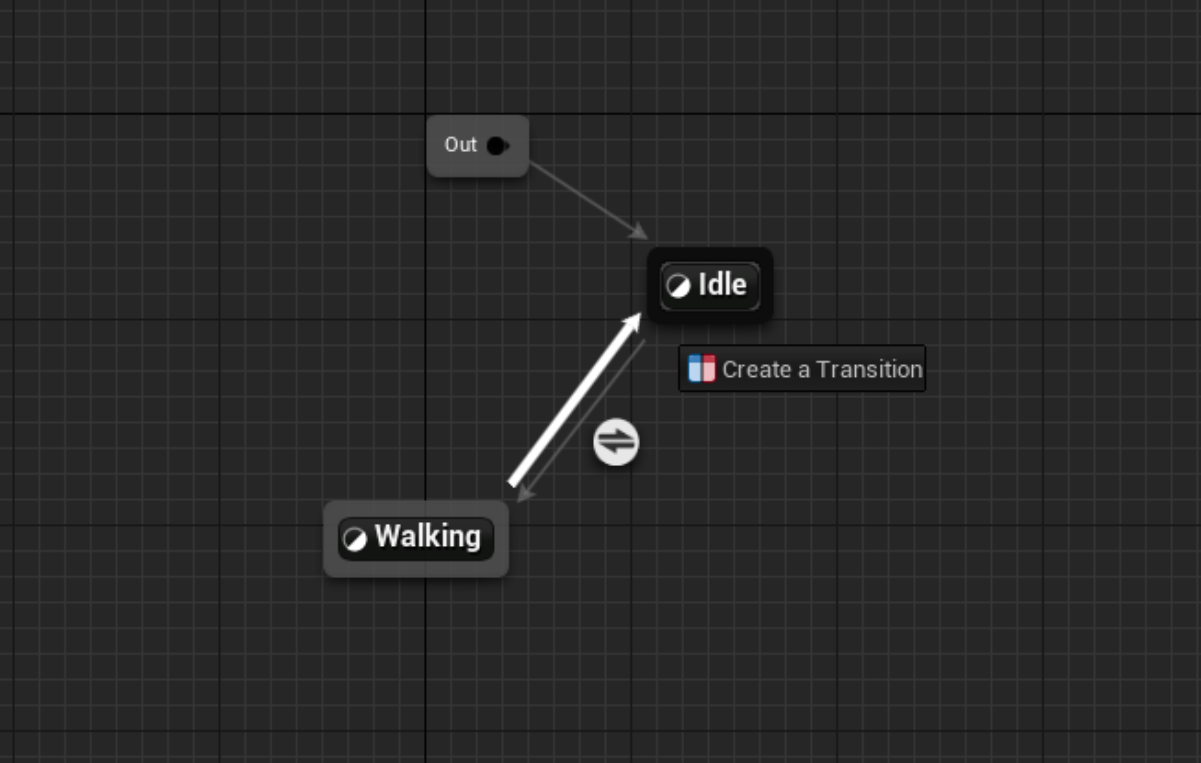
With this the Idle will change onto “Walking” whenever this condition is evaluated to true. We’ll need another condition for going back to Idle again, so we’ll drag from the edges of the Walking node onto Idle and put the reverse condition, also putting a Play Walk node on the state’s internal animation graph
If we now press play, we can see how the state machine works exactly as the example in the previous chapters. We’ll expand on them now, but first need to modify our character and add some extra sequences.
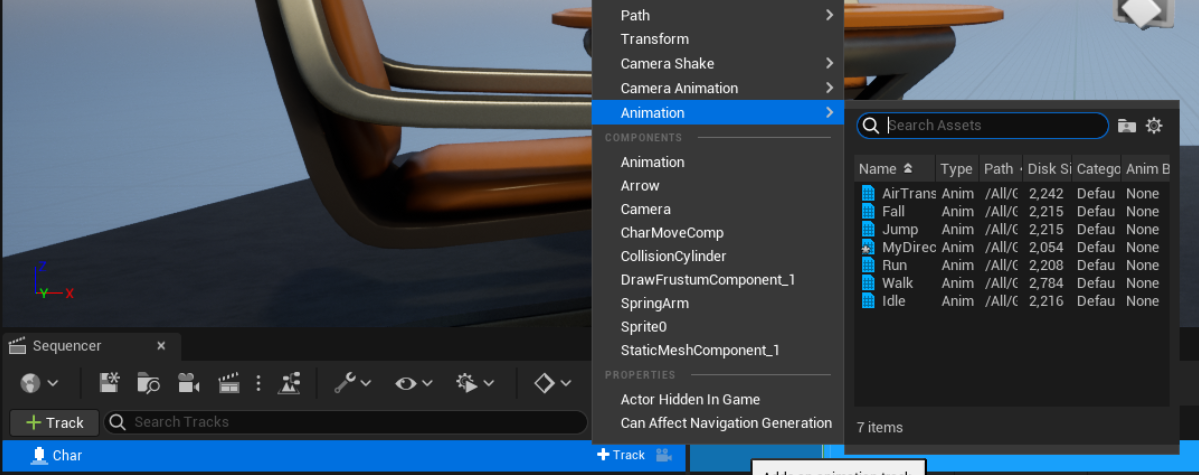
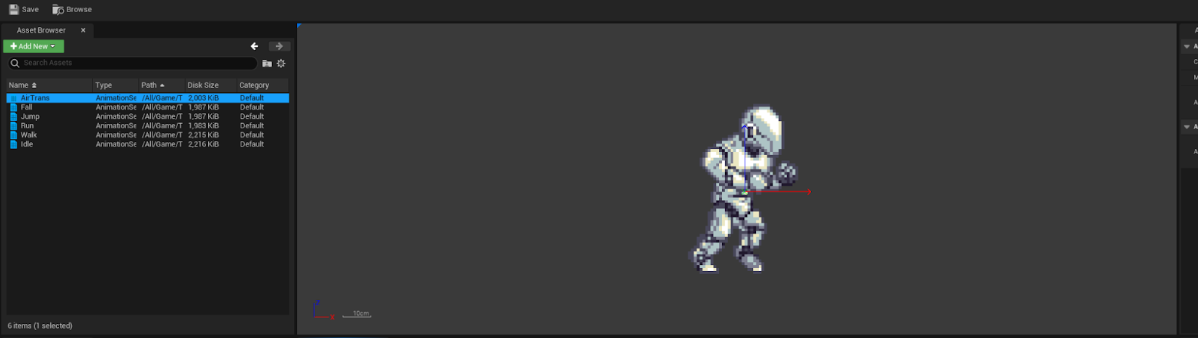
First we’ll create the other animation sequences that we are missing, these are: Jump, Fall, Run, AirTrans.
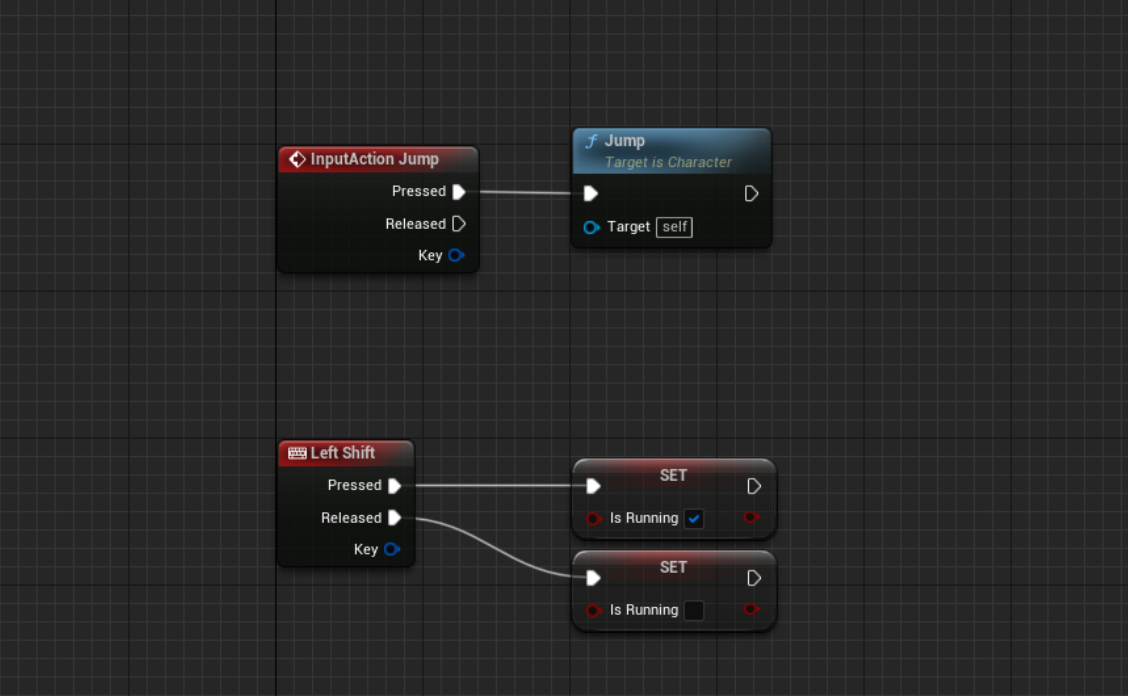
And we’ll add a simple “boolean” into our character, that changes a “IsRunning” variable. This action should also change the character’s movement max speed, but we’ll leave that out as we’re only interested in rendering rather than gameplay code. Inside the character we will add a Run mechanic and a Jump mechanic.
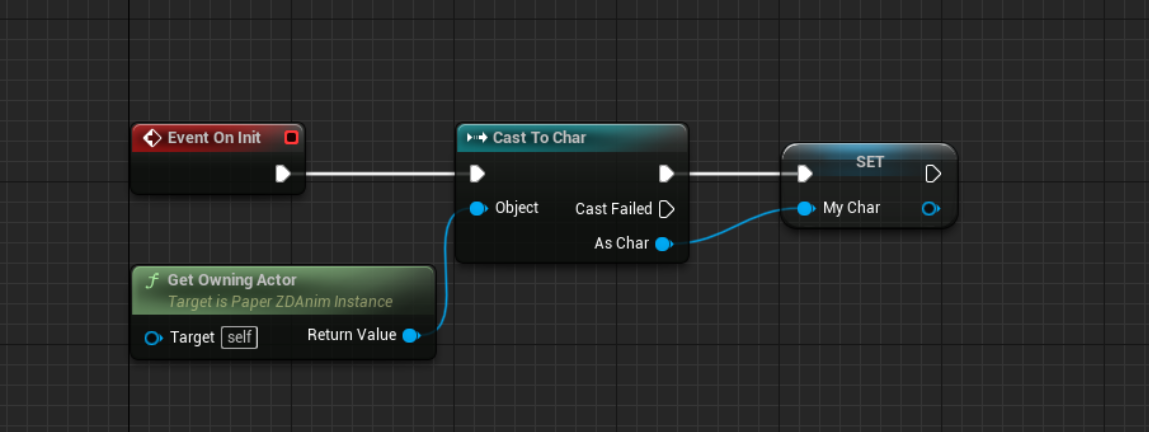
We’ll also go to our Animation Blueprint’s event graph and create a variable for our character, so we can query it when needed. We’ll use the event OnInit that gets called whenever the Animation Instance (class that this blueprint builds into) gets created.
Now, we can go into the state machine’s node Walk and change its internal animation graph to display either Walk or Run depending if the character is running

If we press play now, we’ll see that the character changes behavior and alternates not only between being Idle or Moving, but it can distinguish if it should run or walk. The logic for this is tightly packed in easy to modify sections and modularized, which ensures that it’s as easy to iterate as it was to create.

We’ve used the state machine to drive the animations of our character in a standard way, the features we’ve seen up until now are shared with the default behavior from the state machines present on the Engine’s Animation Blueprints, but there are some 2D specific features that we can use to make 2D development easier and more manageable, and to overcome hurdles that come with the nature of frame by frame animations like Paper2D flipbooks are.
We will learn about these features while continuing the development of our character, by adding a Jump functionality to it, first we’ll want to make sure our Character can jump, for that we’ve already added the needed code in the previous chapter.
Imagine having a very big animation state machine driving your character, and you want to add airborne animations to it. Airborne animations can happen at almost any state, and if the animation graph is big enough, this would mean you need to create a connection from every state to an Airborne state if you wanted to keep the behavior on the same graph. While it is true that there are multiple ways to implement the jumping (like creating a separate state machine for it, and then switching between them on the root animation graph), we’ll approach this by implementing the Jump functionality on the same graph, as a matter of example.
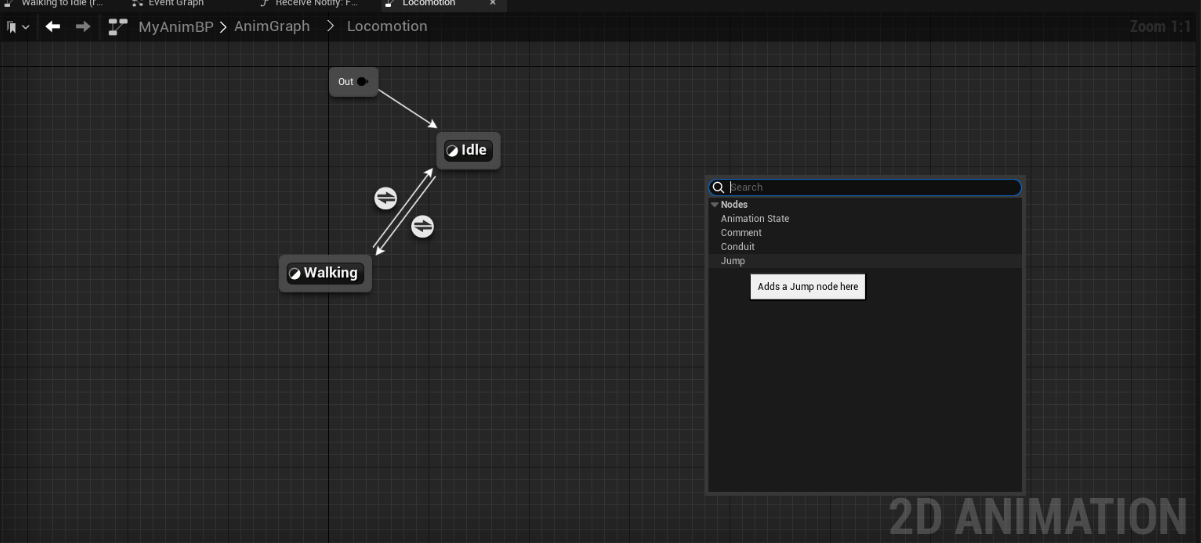
PaperZD comes with JumpNodes, which are “shortcut” nodes that you can put wherever in your state machine that can be triggered by code to force the state machine to go to said node. These nodes are useful for interrupting the state machine usual flow for things like being damaged or, like in this case, jumping or being airborne, while still keeping the logic inside the same state machine.
We’ll first create the logic of our Airborne states, for this we’ll first create a JumpNode called “Airborne”, the name is important as it is the identifier used for later triggering said jump.
Add a JumpNode by simply right clicking and adding a node as you would do a state or a conduit, then change the name to “Airborne”.

After that we want to create the jumping logic: When starting a jump (or being airborne) we’ll first run the Jump animation (even though we could have just fallen), we’ll explain this after the base logic is completed.
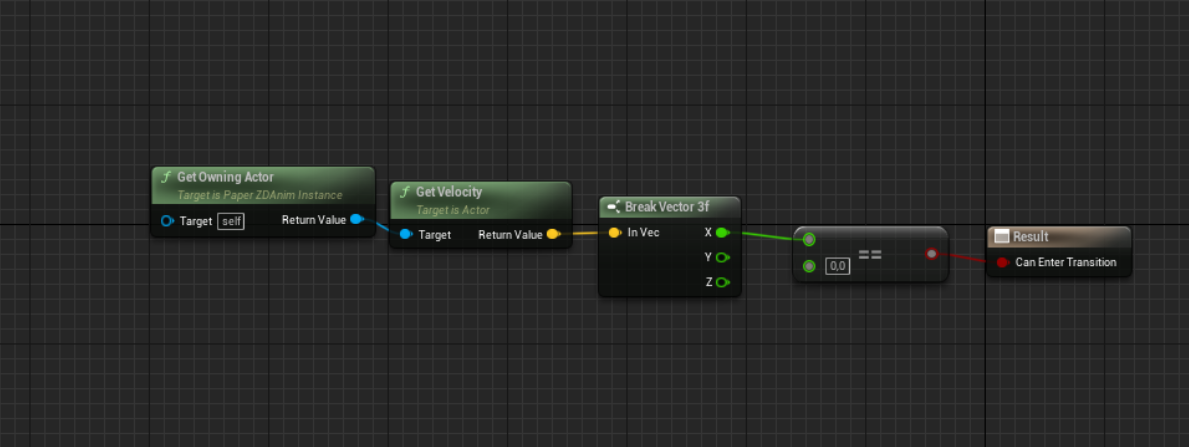
After Jumping, one would start falling (after the apex completes), we’ll add the Falling state. Passing from Jumping to Falling happens when the upwards velocity of the fall becomes negative (meaning we are falling and not going up). Finally we reach the “grounded” states, either walking or Idle, we’ll connect to Walking, as it’s more likely we’ll be moving and not perfectly still, but this could change depending on how the landing logic works in a game.
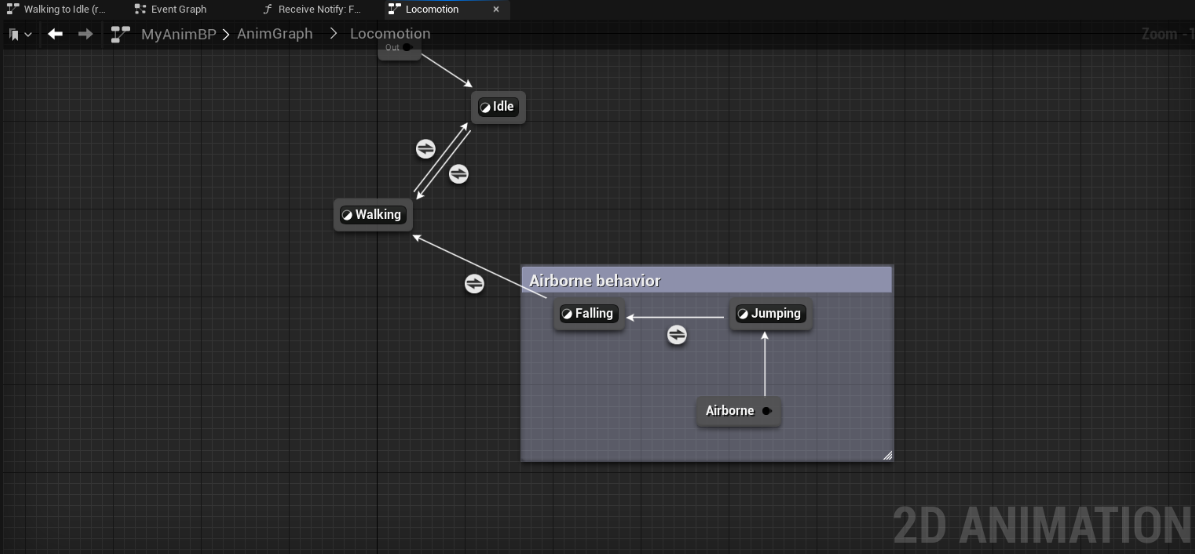
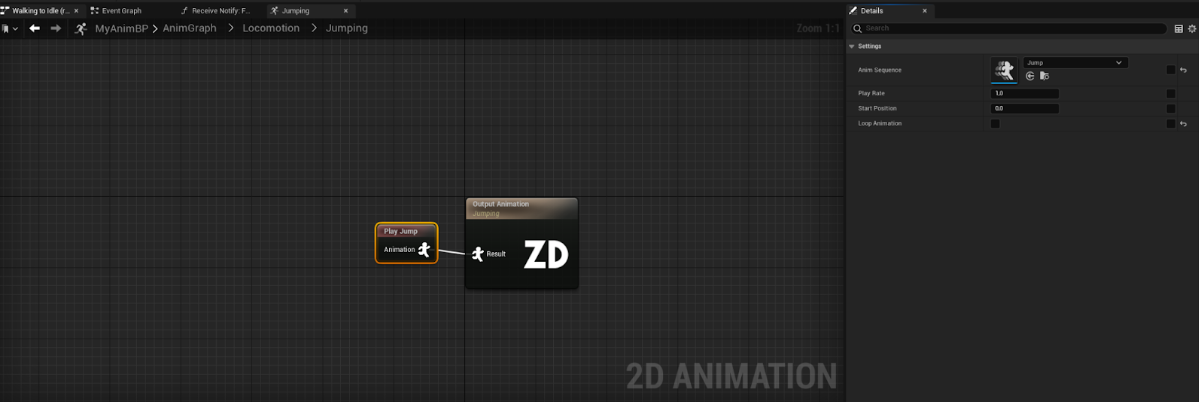
We’ll also put the Jumping and Falling animations in their respective states, making sure the Play Animation Nodes are set to not loop, as these animations were made with this in mind.
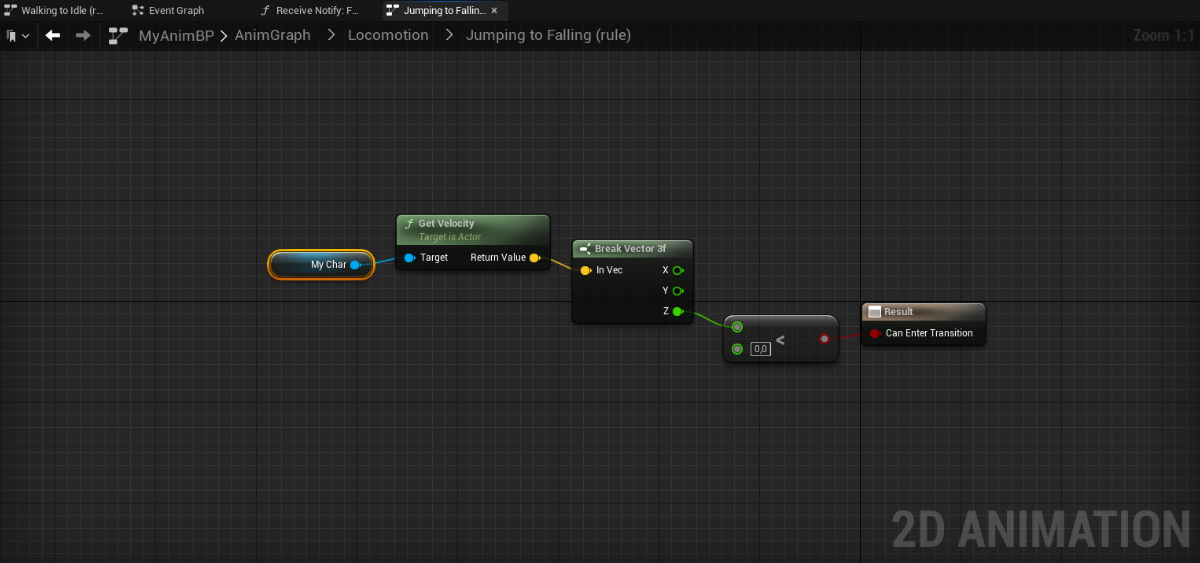
Inside the link between Jumping to Falling:
And inside the link between Falling to Walking:
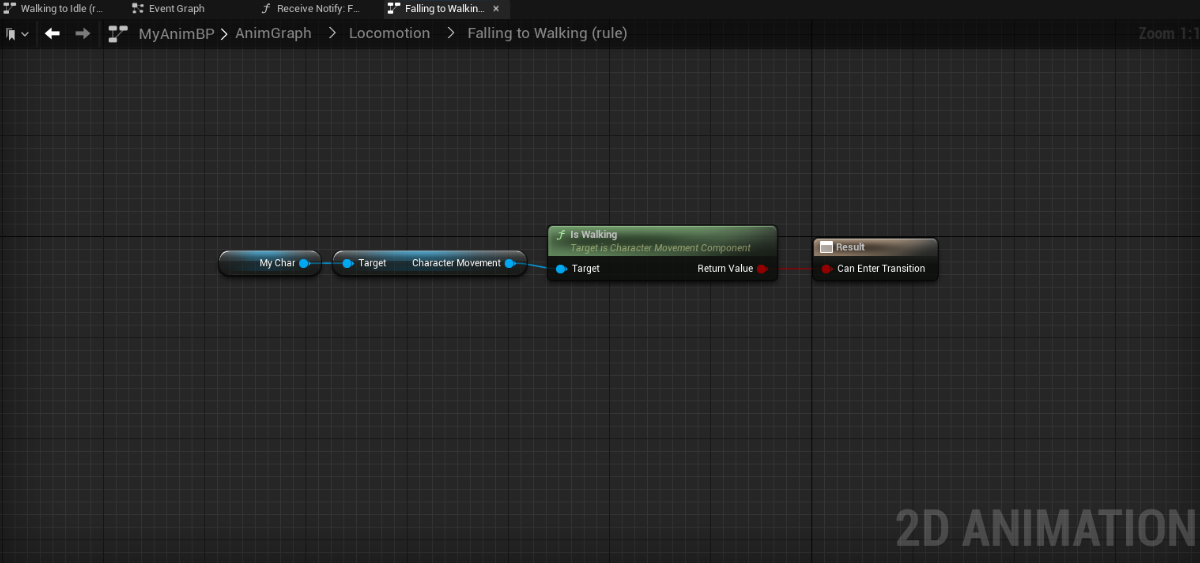
By default, Animation Blueprints have “Allow Transitional States” setting enabled on their class defaults. This makes the state machine continue evaluating the states until a stable one is found. In the example above, if your character falls (without jumping), the state machine will first evaluate the Jump state, and right away evaluate the transition and move to the Falling state, as the velocity is negative; the state machine would then stop there, as no other transitions are available and the Falling state would render, the Jump state won’t. The Jump state in this example becomes a transitional state, which helps create a more compact state machine, removing the need of extra connections by allowing the state machines to flow naturally to their stable state.
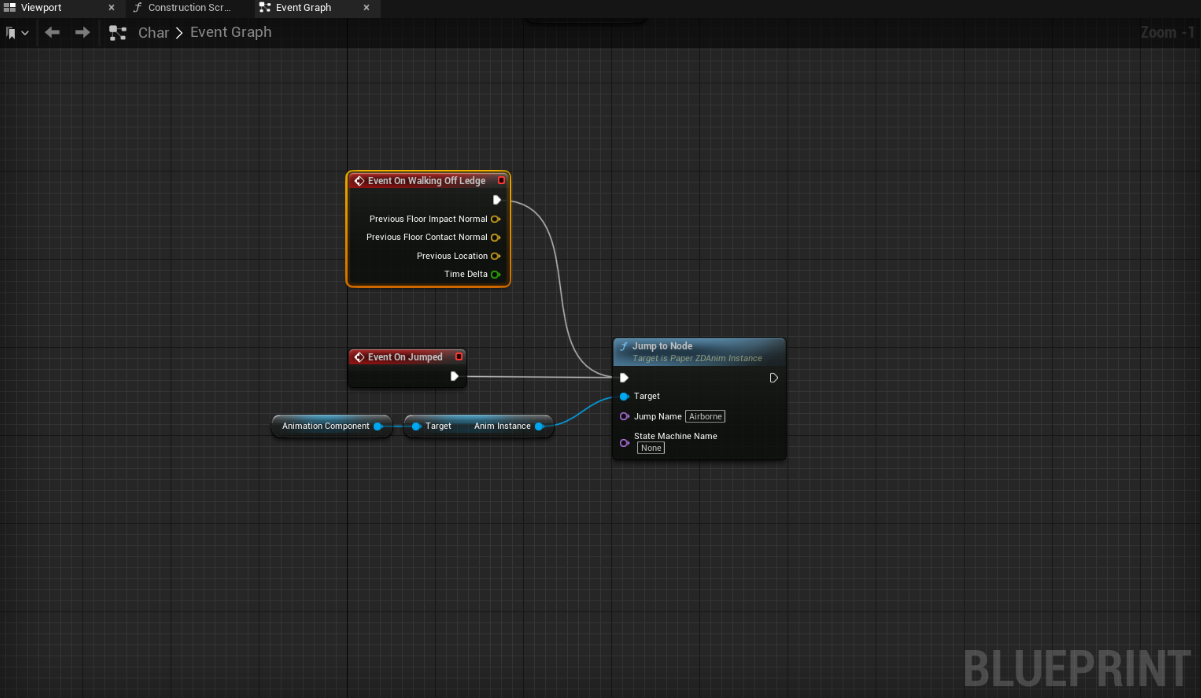
Now that the State machine is ready, we simply need to trigger the JumpNode by getting the AnimInstance that is stored on our Animation Component. As explained before the AnimInstance is the instance of the Animation Blueprint we’re building and that it’s used to drive the animations of the component.
In our character’s blueprint we will add the following nodes, to detect Jump and Falling behavior, both of them will trigger the same JumpNode and the state machine will do the rest.
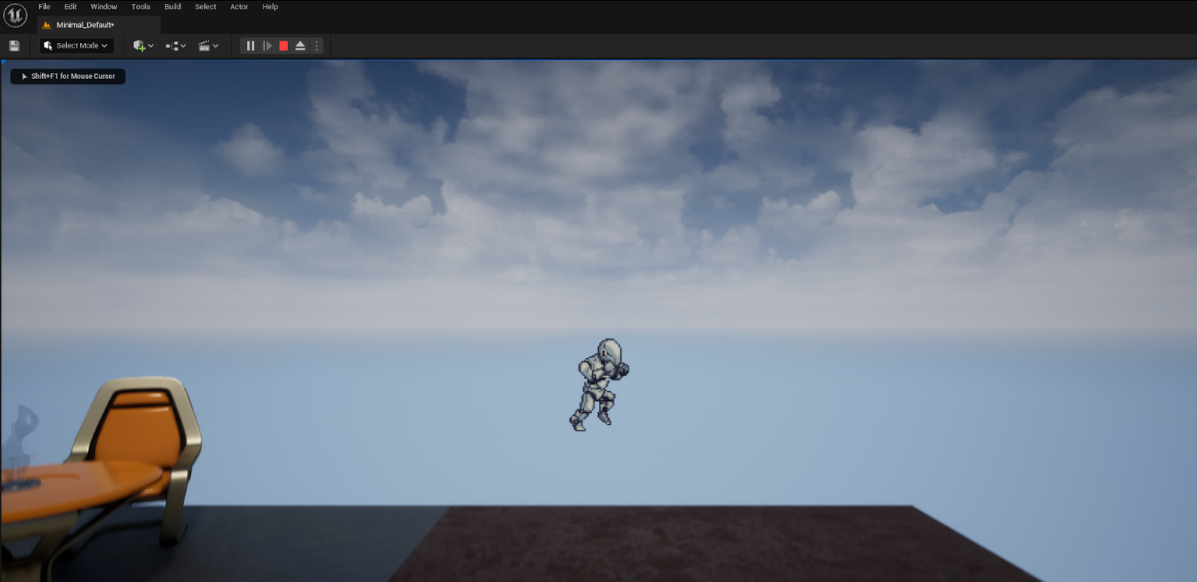
If you test now, the character will have a Jump/Fall animation setup, but it will have no intermediate animation and will look very stiff.
Skeleton animations have a distinct advantage over frame by frame animations and frameworks like Paper2D, these allow for the animations to blend naturally between states, and make sure the flow of the action never feels too cut. Frame by frame animations, because of their very nature, cannot blend naturally and the “blending” animation needs to be added as an extra asset that will play in between 2 animations.
While PaperZD has support for blending of skeletal animation sources (assuming the extensions are set up), it also has some tools to add intermediate animations in an easy manner, creating rich characters that flow extremely well, while keeping the graph side at a manageable size.
In the previous chapter, we added a Jump/Fall behavior which looked stiff because it lacked the intermediate state. We’ll first see how an intermediate animation would be added normally without the use of “Transitional Animations”, to see why adding intermediate states is not sustainable.
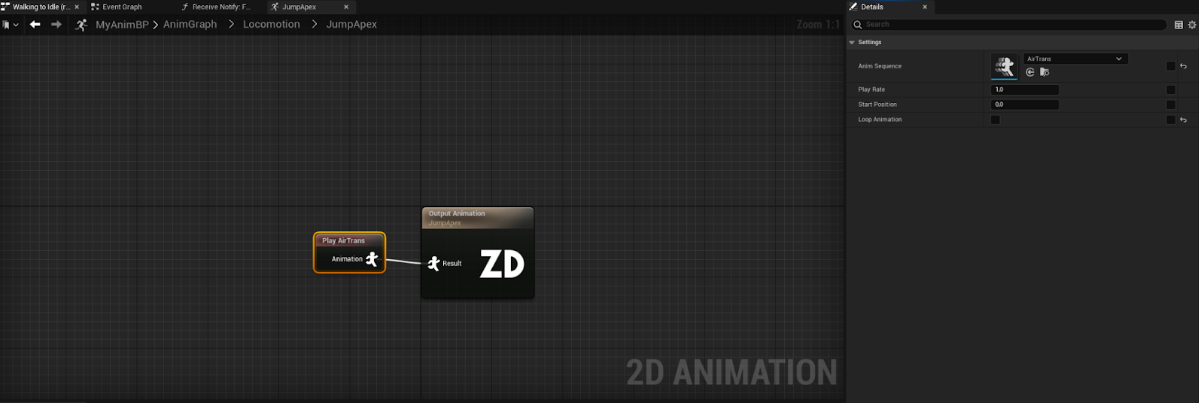
For reference, we will add an extra intermediate state between the Jump and Fall animation, that we will call JumpApex.

The link between Jumping to JumpApex is the same one as we had before, it triggers when the upwards velocity becomes negative. Inside the JumpApex we add the AirTrans animation sequence and we make sure it’s set to non-looping. This last point is important.
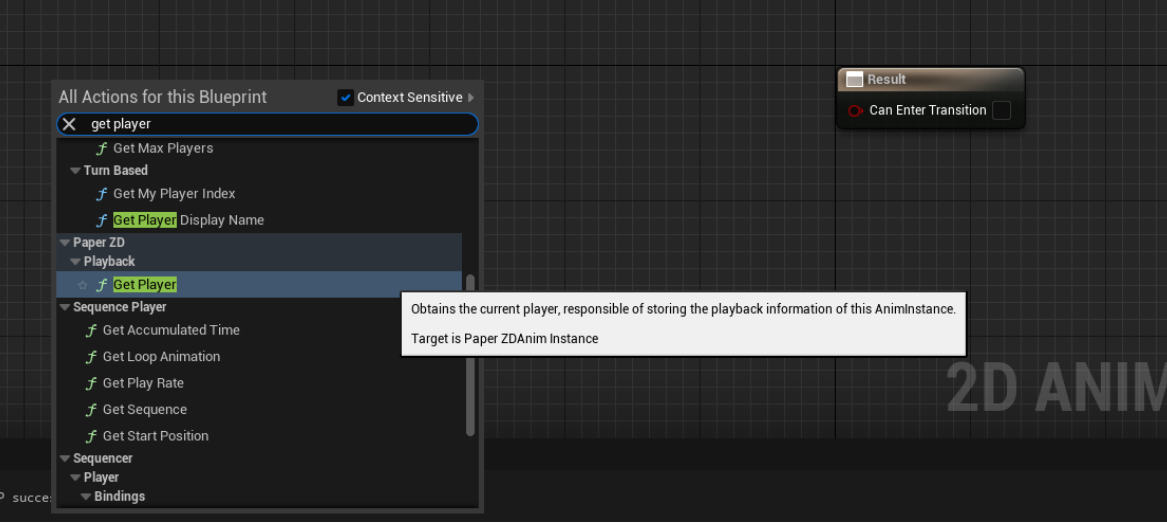
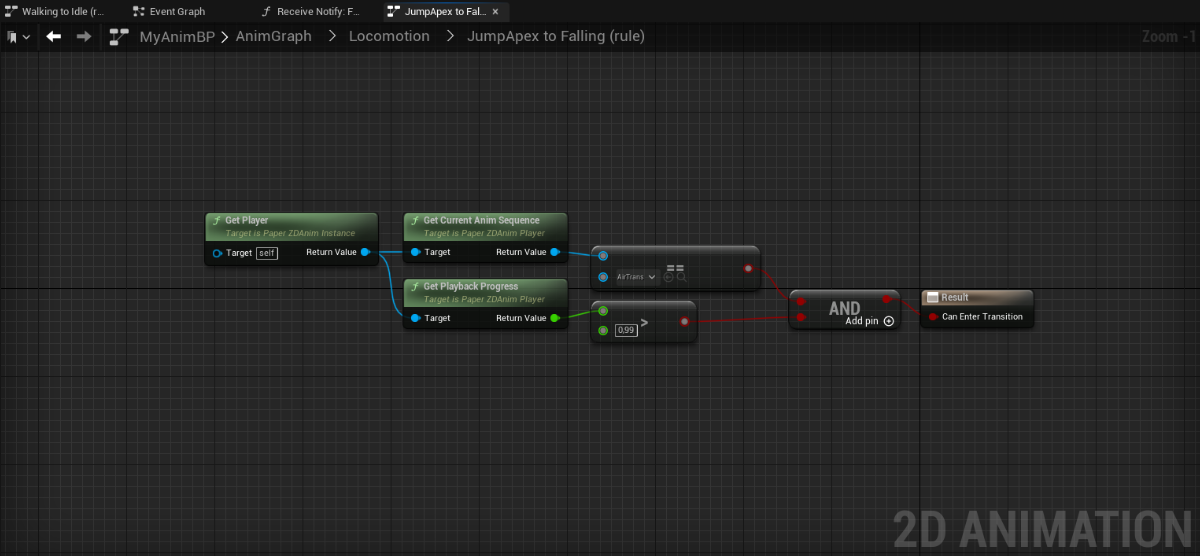
After that, we need to set the transition between JumpApex and falling. Because this is an intermediate animation, we want to stop playing this animation when its playback is complete, for this we can query the Anim Player that lives inside the AnimInstance that this class compiles into. The Anim Player will be explained in more detail in later chapters, but as a quick explanation, it’s the object responsible for driving the playback of the animations inside the blueprint.
We go inside the transition and trigger the rule when the Animation Player’s progress gets close enough to completion.
We’ll also need to add a check against the current AnimSequence that’s rendering is actually the AirTrans one. This is because we enabled “Transitional States”, and these tests will run before actually rendering our transition animation, meaning that the PlaybackProgress will be stuck at 1.0 due to the Jump animation still being rendered.
Note: It’s important that the animation is set to non-looping, as the playback progress could loop before we trigger this rule, this is especially true in low framerate environments.
Note2: The animation player can manage multiple animations at the same time, the Playback Progress will refer to the animation with the biggest weight that is being processed currently. This is not something that non-blendable animation sources (like Paper2D Flipbooks) need to take into consideration, as blending is not available and thus, there’s only one animation running at any time.
With this setup, we now can see how the flow of the character improves dramatically due to the intermediate animation, but this also brings a new issue. What happens if we’re in the middle of the AirTrans animation and suddenly hit the floor? The animation would still continue playing until it reaches the end, as per the transition rule. We need to add an extra check for being grounded. The animation logic starts to bloat and the more intermediate states we want to add to make a richer character, the more the graph becomes unmanageable.
We can fix this issue by replacing these intermediate states with a custom feature from PaperZD: Transitional Animations.
As we saw in the previous chapter, adding intermediate animations is a cumbersome process that requires adding more states (and thus more logic) to an animation graph which in turn bloats it extremely quickly, making it really hard to debug and manage for even medium-sized projects. PaperZD comes with a feature that attempts to solve this: Transitional Animations.
Transitional animations work by enabling the user to add a custom and optional animation graph on a transition node, this transitional graph runs a single loop of an animation and cannot have internal state machines, it’s meant to be a simple graph for filling the animation data required in between. When the single loop of the animation completes, the system will continue rendering the state node Animation Graph.
Transitional animations are “optional” in nature, and if the target state they point to stops being the active one, they stop rendering. Only the last transitional graph will run, as an “introduction” to the target state it points to.
Let’s first go back a few steps, from before we added the intermediate state.
![]()
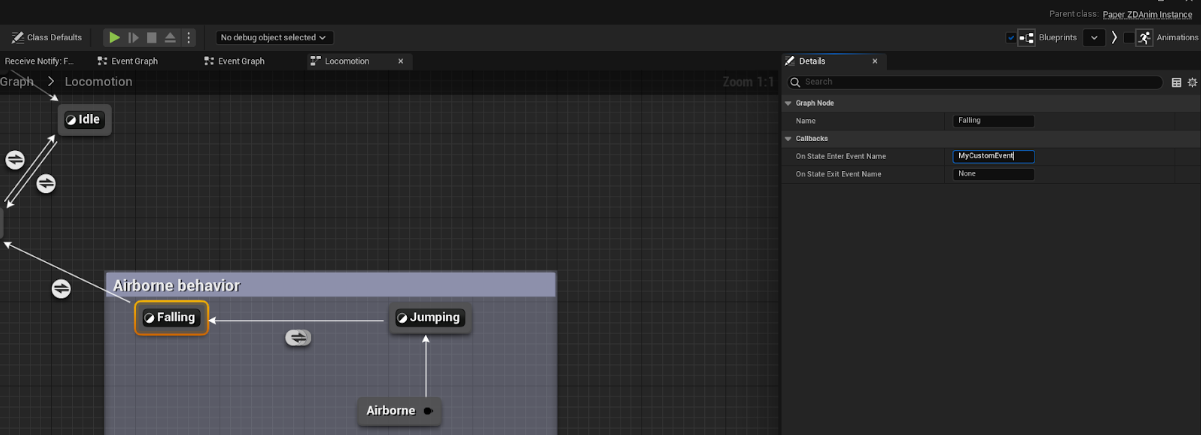
Adding a transitional graph is easy, simply click on the transition that you want to animate, in this case the Jumping to Falling transition, and click “Use transitional animations” on its details panel. You’ll see that the transition itself changes its icon, to reflect the change and showing that it’s being animated.
![]()
Now we can click on the “Open Animation Graph” button that is at the side of the checkbox we enabled. We’ll enter an animation graph. Let’s add the AirTrans animation sequence to it.
![]()
Note: You’ll see that inside this graph, you will be unable to add state machines and set the animations to loop. Every animation in this graph is meant to have an end, and thus, looping will be disabled.
With this, the transitional animation has been correctly set up, no more code nor configuration is needed. If you run the example now, you’ll see that the character works just as before, but it now also aborts the transitional animation when touching the ground before it finishes.
Transitional animations are a key feature of PaperZD and a very powerful way to give more life and movement to a character without increasing the complexity of the animation graph.
There comes times when adding animations is not enough to implement certain features of a game, and a more granular control of the playback is required. Because of this, multiple ways of managing the playback of the animations are present, to enable users to accomplish their goals as easily as possible.
As shown before, Playback rate can be managed in a “per-node” instance on the Animation Graph.
With this one could implement “climbing ladder” animations depending if the character is moving or not, like old platformers, by pausing the animation when not moving or even reversing it when going down the ladder.
Sometimes though, more global control is needed, and adding a variable on every Play Node wouldn’t be scalable enough, in these situations it’s more sensible to directly interface with the AnimPlayer.
PaperZD’s playback control is centralized via a central object that works as the Playback manager which ticks animation nodes, triggers notifies and calls events pertaining to the state of the animation sequences being run. You can access this object by simply calling the following node:

This object comes with a set of interesting callbacks and events for managing the global state of the playback of animations.
Using this object, you can easily pause the playback, change the playback mode (forward or reversed) and query the current state of rendering (knowing the time of the current animation, which animation is playing, etc).
Note: Certain calls like the current animation or animation time, only take into account the biggest weighted animation on the mix. This is only important on skeleton and blending enabled animation sources, as those can mix multiple animations into a final blend.
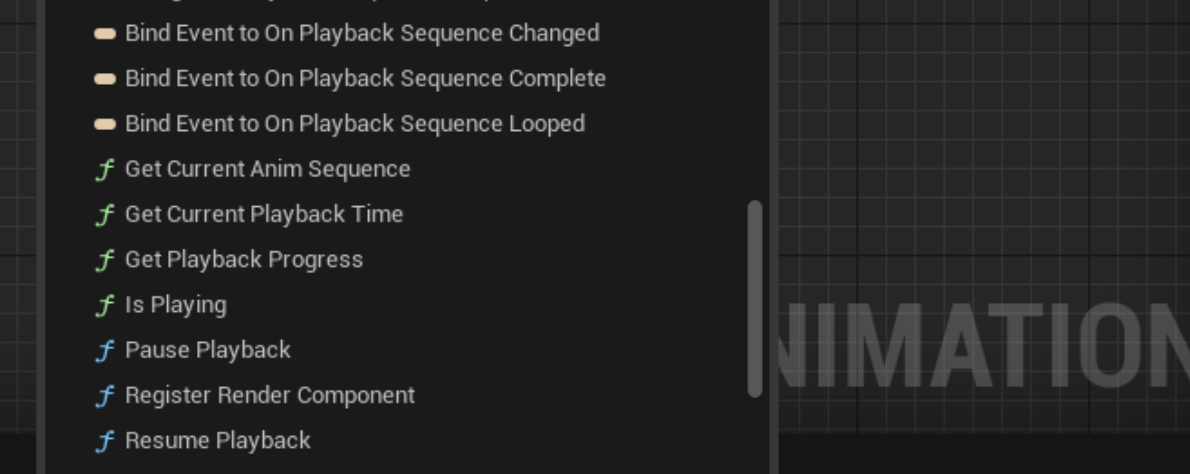
The AnimPlayer also comes with a set of events that get automatically called during playback:

Two of these are already implemented by the Animation Instance and can be overridden directly:
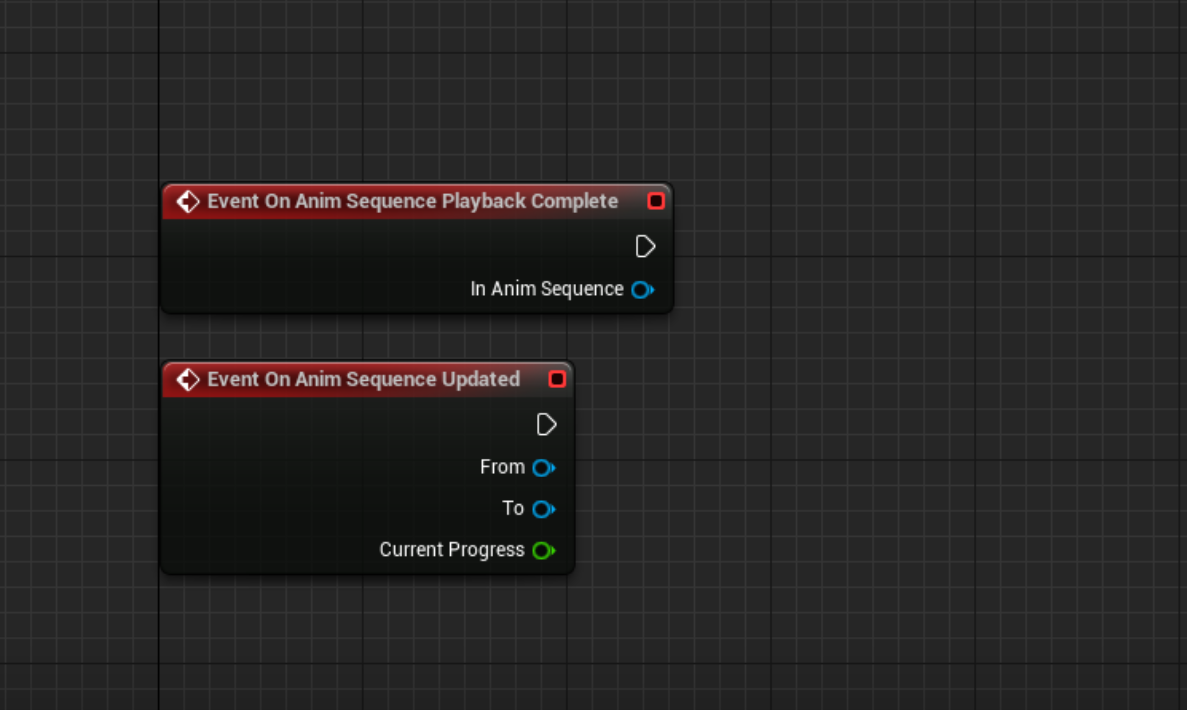
These events (specifically “Playback Complete”) are how the Transitional Graphs detect that the transitional animation has finished its playback. You can bind or implement them to be notified when the rendering of an animation changes.
Up until this point we’ve shown how to animate a sidescroller game. These kinds of games usually just have 2 views (left/right) and will realistically only use one animation per “state” of the player, the reversed direction usually is mirrored. In practice this means that for every one action, there’s only one “animation” that needs to be rendered.
Obviously this isn’t always the case, and other types of 2D games exist that in fact, require multiple animations for different directions of the same action.
Games like top-down, isometric, boomer-shooters heavily rely on simulating a fake 3d animation by drawing the same animation multiple times in different angles, and then placing them depending on an angle variable. This already presents a big challenge in the art department by increasing the work by 4 or even 8 times, depending on how many directions are being shown. Obviously when implementing the animations, we would rather streamline the process of adding directionality as much as possible.
Usually the answer that engines and tools present to users that need to add directionality to their sprite, is either force them to create “Blend Spaces” and setup every animation on a graph, or forcing them to change the animations by code; both of which require too much time to configure and increases the amount of time the user would stay in this section, thus increasing the cost of these projects.
PaperZD streamlines this step as much as possible and presents a powerful feature that can help in these situations: Multi-Directional Sequences.
Because AnimSequences are an abstraction of an animation to play, and strictly speaking, every rotation of an animation still is the same animation (for the game’s purposes), we added the ability to add “rotations” inside a sequence.
As an example, we will go into our Animation Source and create a new Animation Sequence, we will call it “MyDirectionalSequence”.

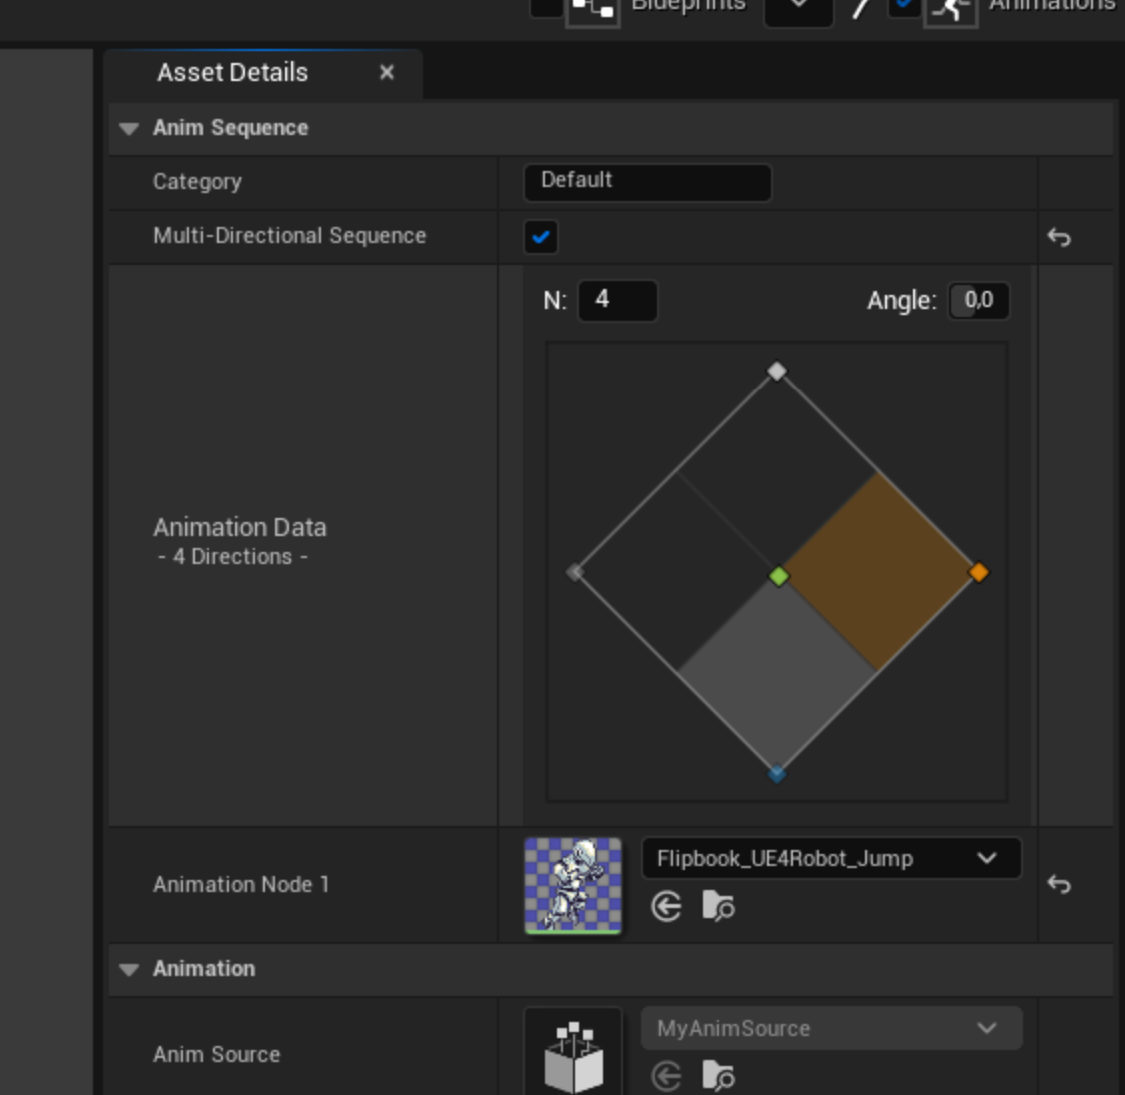
If we open this new Sequence and see its details on the right, we will see a checkbox that says “Multi-Directional Sequence”

Clicking on it will show the directionality widget, used for setting up the directional information of the AnimSequence
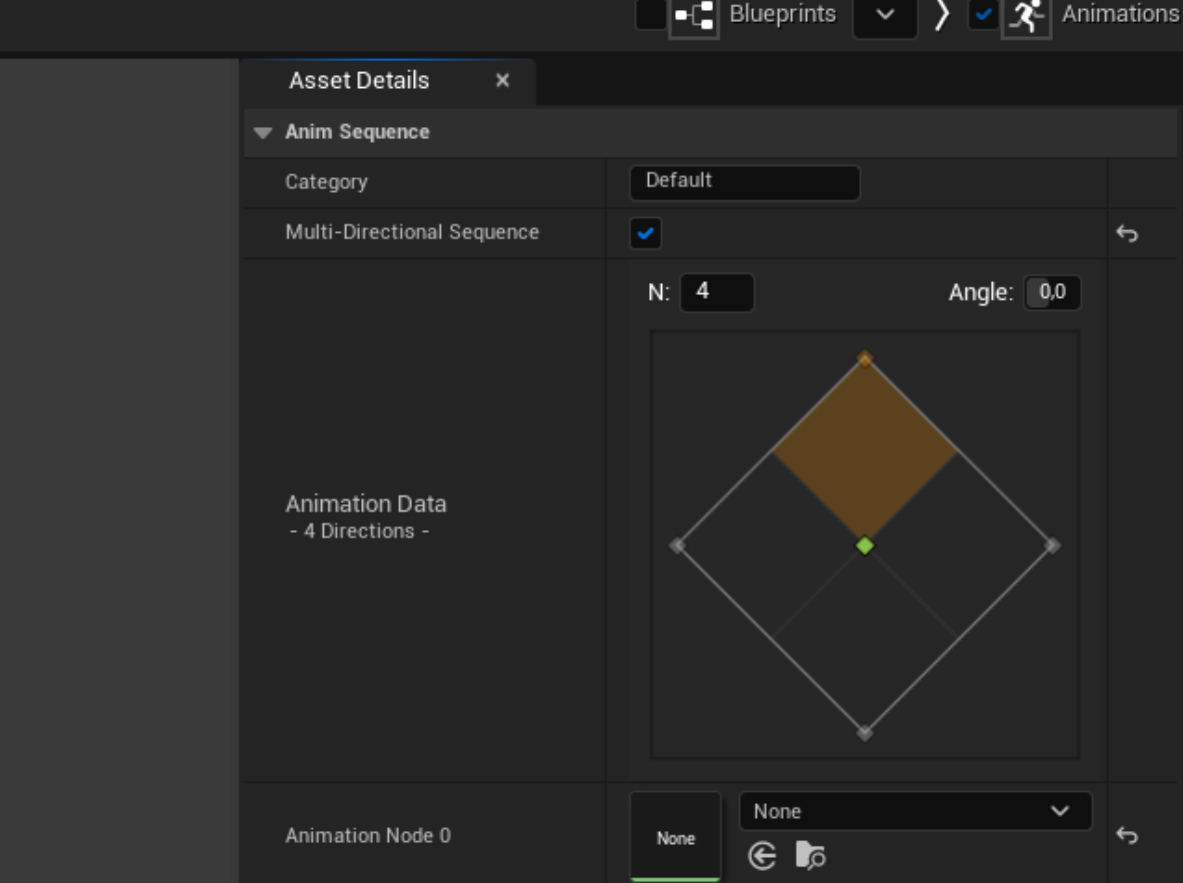
You’ll see that this new widget contains 4 corners, and the bottom “Animation Data” has been replaced by “Animation Node 0”. The golden section is the currently selected direction, clicking on another square will select that position
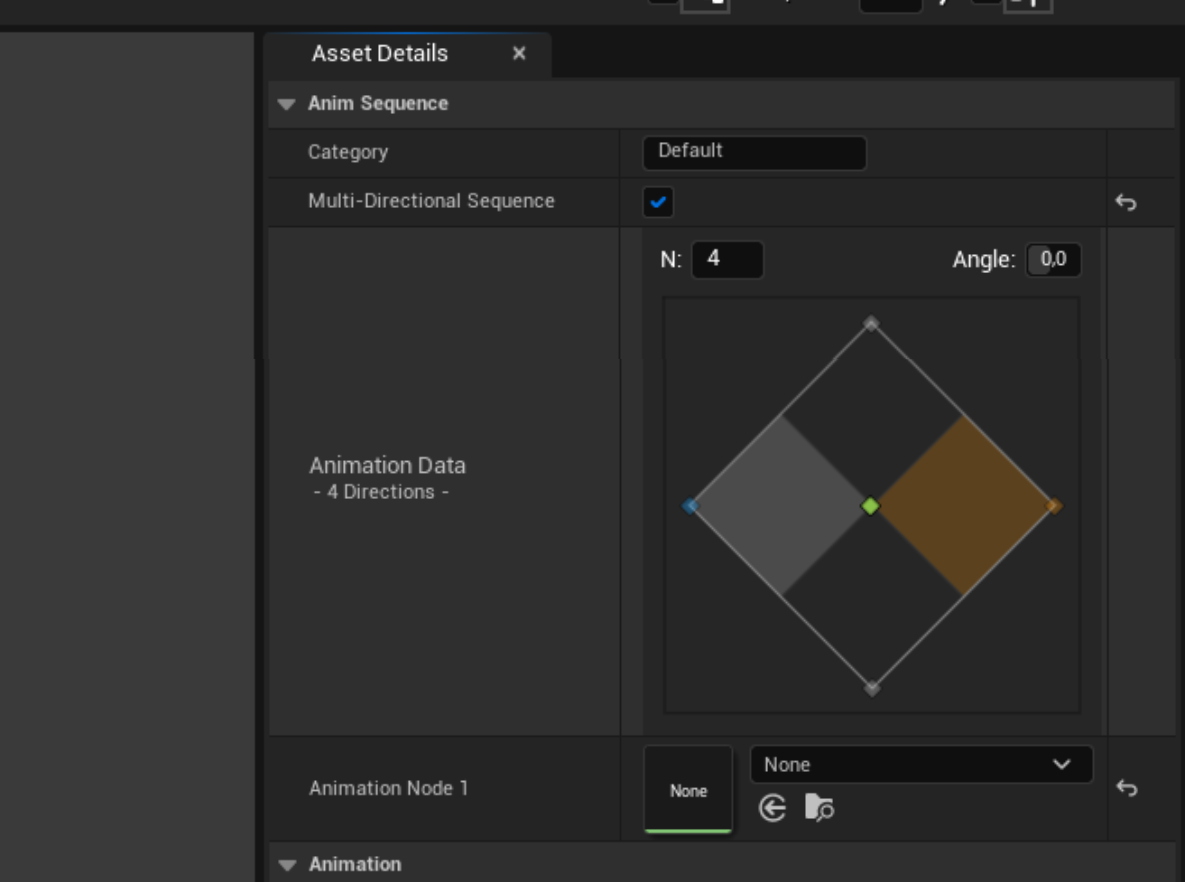
We can also modify the number of directions and even the offset angle of them
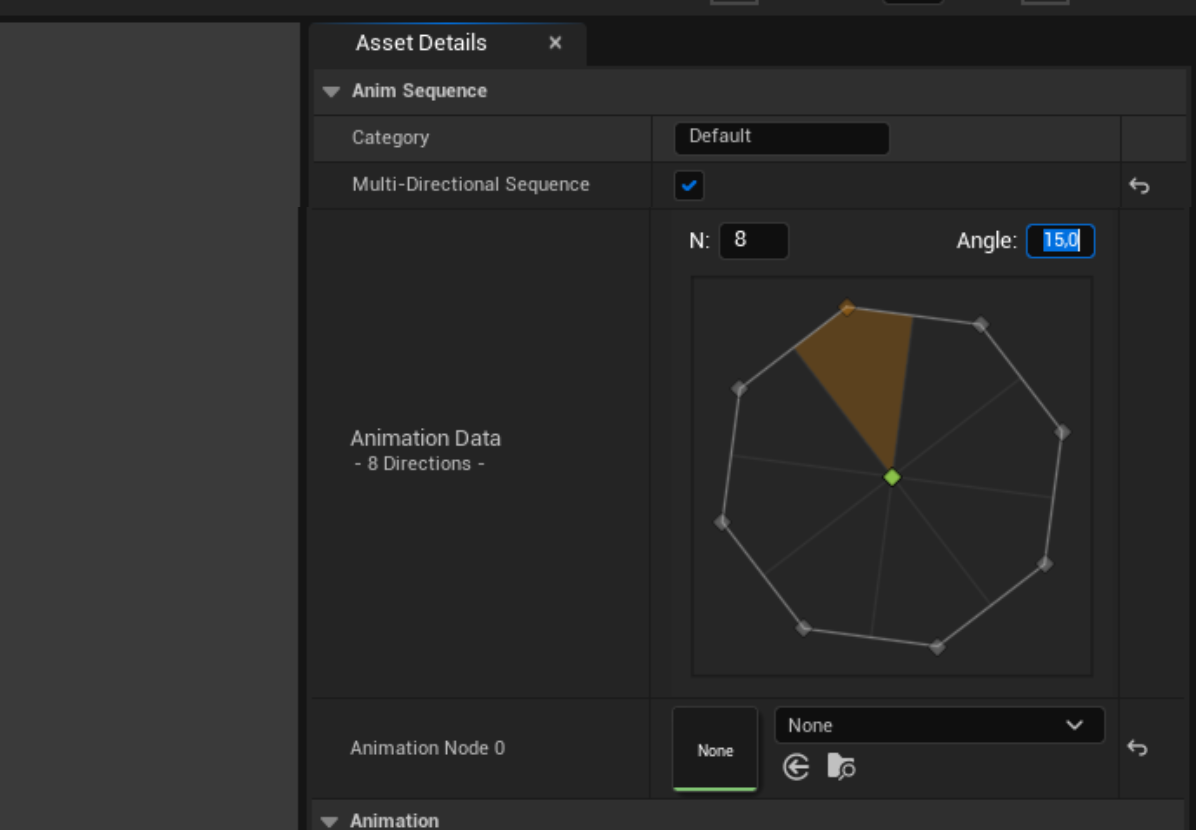
Because the example project doesn’t contain a top-down animation, we’ll use the flipbooks we already have for demonstration purposes. Set the directionality to N = 4, and fill the directions with different animations.

Note: Directional sequences are meant to represent the same animation, and thus, assumes that all of the sequences have the same length. The length of the sequence will be inferred by the first node (Node 0).
If we focus on the widget and hold the shift key we can move around the preview node that will display which animation would be displayed depending on the angle we’re inputting to the sequence.
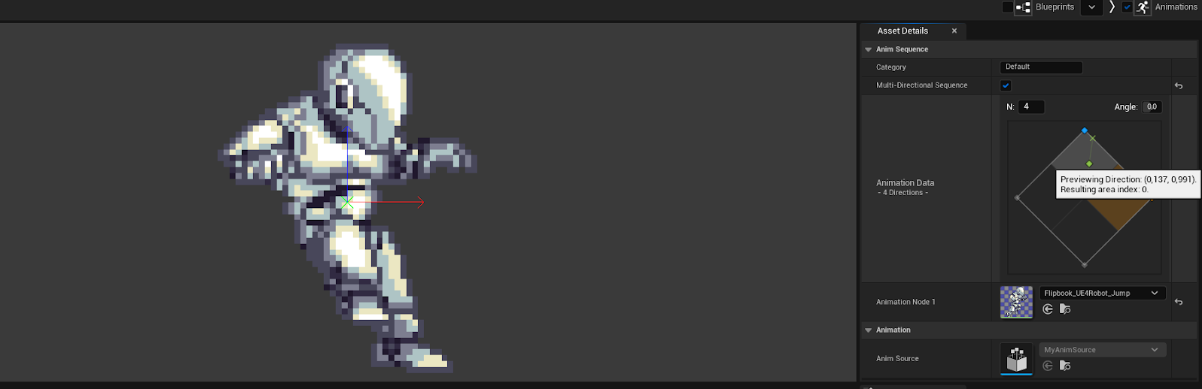
In this case, even if the selected node is the right one (Jump), we’re displaying the top one (Fall).
The resulting AnimSequence can then be used, the notifies will be triggered as normal and the flipbook to use for rendering this animation will change depending on a directional input that we must provide.
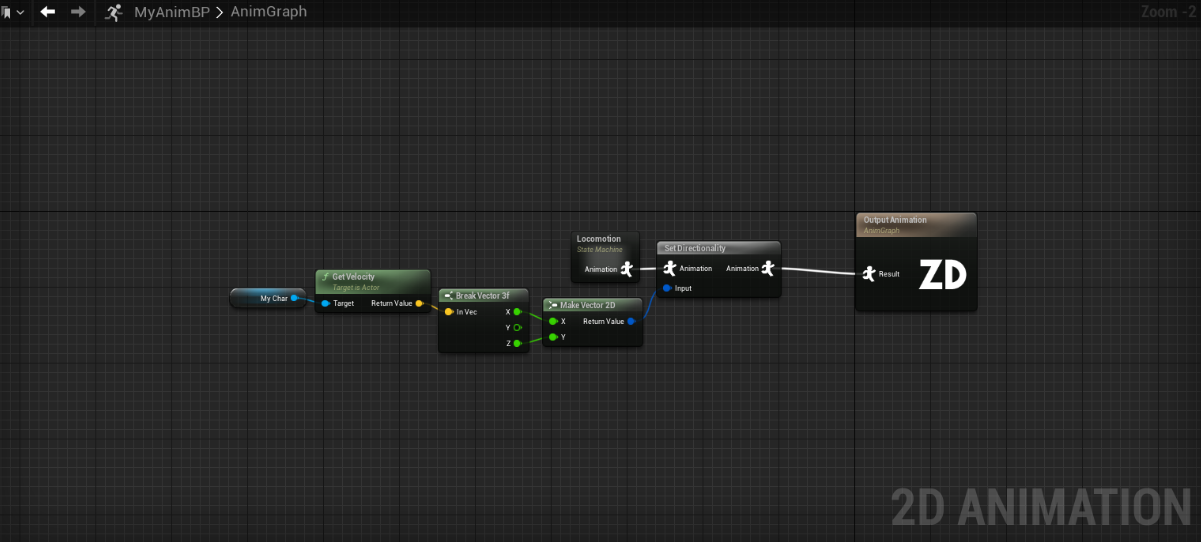
Going back to the Animation Blueprint, we will now let the Animation Graph know which direction we want the system to render the animation (and thus, which flipbook will be displayed). For this we simply concatenate a “Set Directionality” node, that will set up the correct metadata for the correct animation data to be evaluated.
We will use the character’s velocity as the directionality input to the node, this is a FVector2D that will mirror the green preview node. This input can be whatever your project needs, for example:
Note: Changing directions won’t reset the playback time of the animation.
With this we have added directionality to our character. The directionality information is made per-character and not per-animation which ensures that set-up is fast. The system will not fail if a non-directional sprite is presented even if directionality is set.
This way of implementing the characters should be fast to iterate, simply add as many directional animations as needed, then feed the angle in which you are “rendering” the animation, the system will select the correct animation to render for you.
PaperZD is coded in an “agnostic” way, using different objects to abstract the functionality without assuming anything about the nature of them. Because of this, PaperZD can be made compatible not only with Paper2D but with potentially any other external animation source, even skeletal animations like Spine2D or Creature2D.
By default PaperZD adds Flipbook support as this comes bundled with the engine, but any other animation source cannot be bundled with the plugin due to them not necessarily existing in the engine.
Because of this, PaperZD needs to be “extended” with other plugins that can give external support to any Animation Source that you want to support.
A good example is Spine2D support: PaperZDForSpine2D is a plugin that extends the rendering classes, installing this plugin alongside of PaperZD and Spine2D, will give you access to new Animation Sources and new animation sequences and features for use with Spine2D characters.
If you want to code your own support module or plugin, simply check the flipbook support added to PaperZD, for this you need to create child classes for the following:
With these classes implemented, you can tell PaperZD how to handle and even render the animation sources, and even let it know if the animation source supports blending (and thus, enabling blending nodes for it).
The support is given “as is” and changes in the external plugin can destroy the support as we don’t have a way of knowing nor handling the changes that external plugins decide to make.
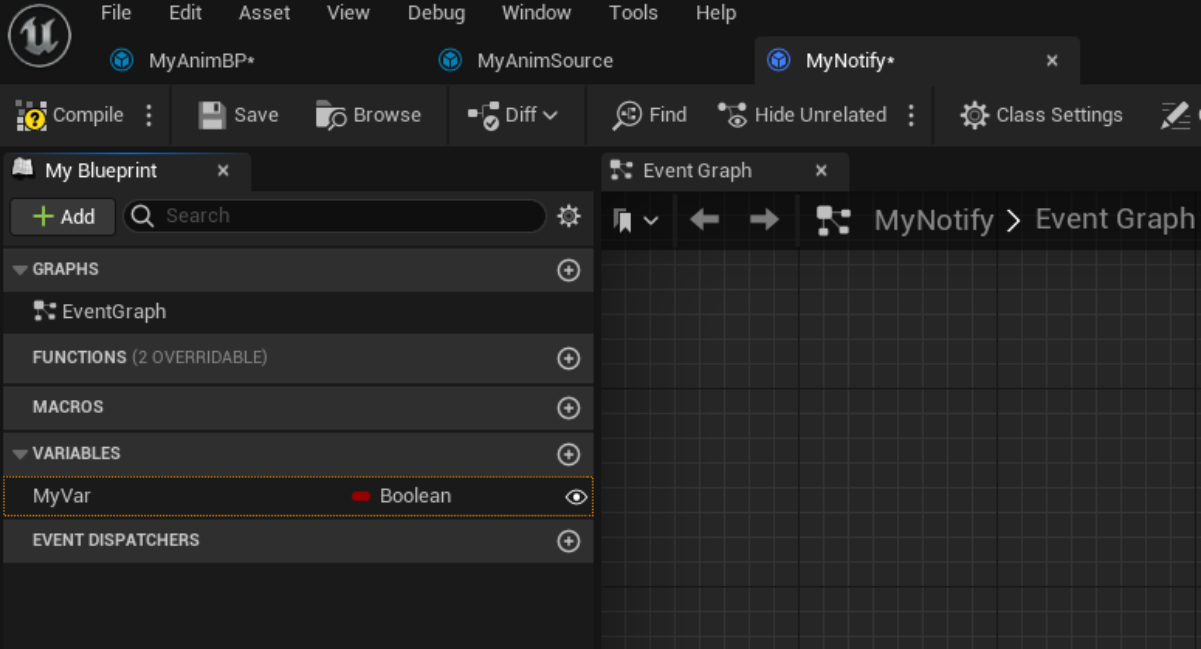
You can create your own notifies by inheriting from PaperZDAnimNotify and PaperZDAnimNotifyState. These notifies can be shared through different animation sources and are a great place to build common functionality.

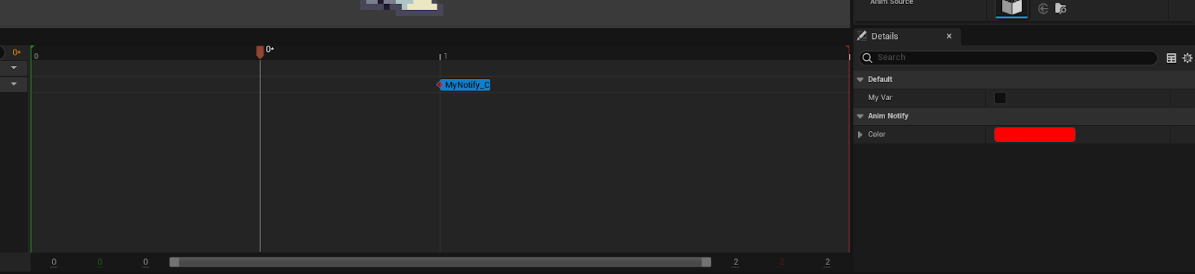
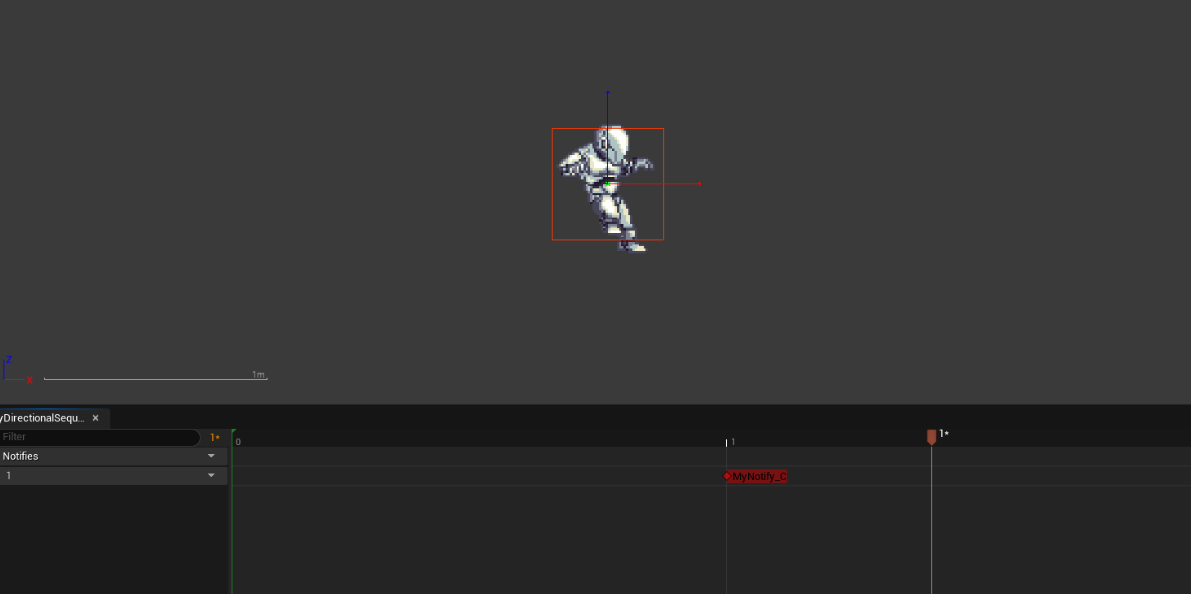
If we create a notify called “MyNotify”, and then going to the Animation Timeline, we’re able to see that it exists.
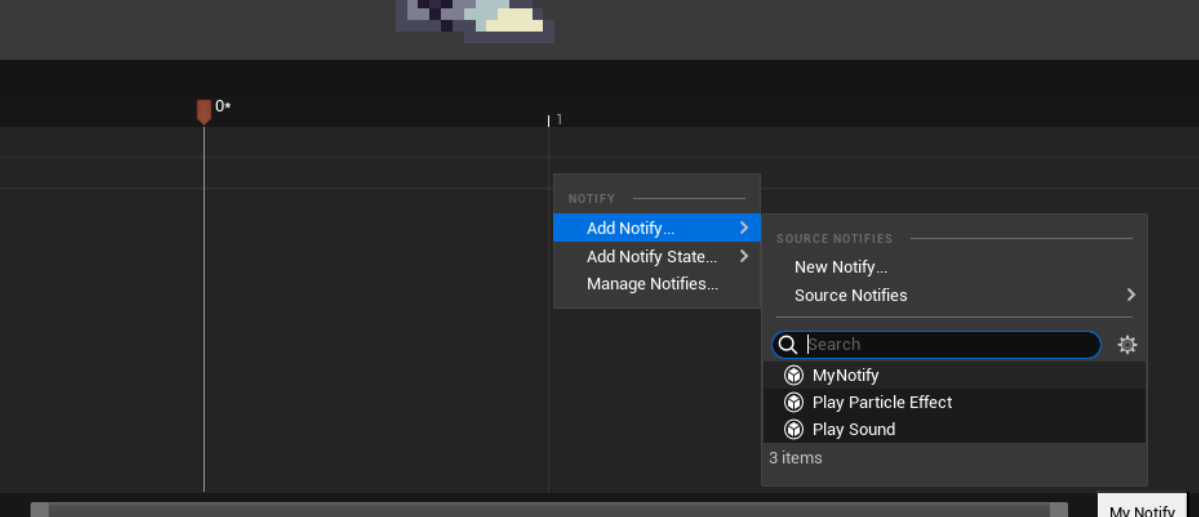
These blueprint objects will work as any normal blueprint, but will have access to a method “OnReceiveNotify”, and Start/End events when it’s a State Notify.

Adding public variables on this blueprint, will enable you to modify their values directly on the timeline.
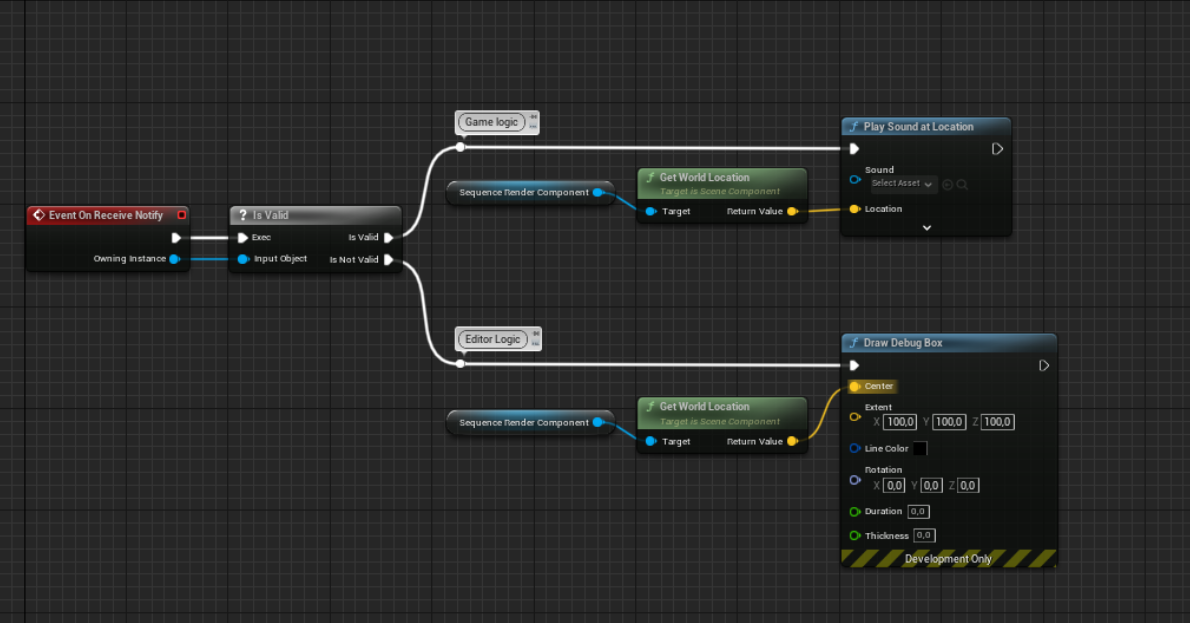
When implementing the notify events, a member called “OwningInstance” will be given to you, this is the AnimInstance that is calling this notify. This object can be null if called from the editor.
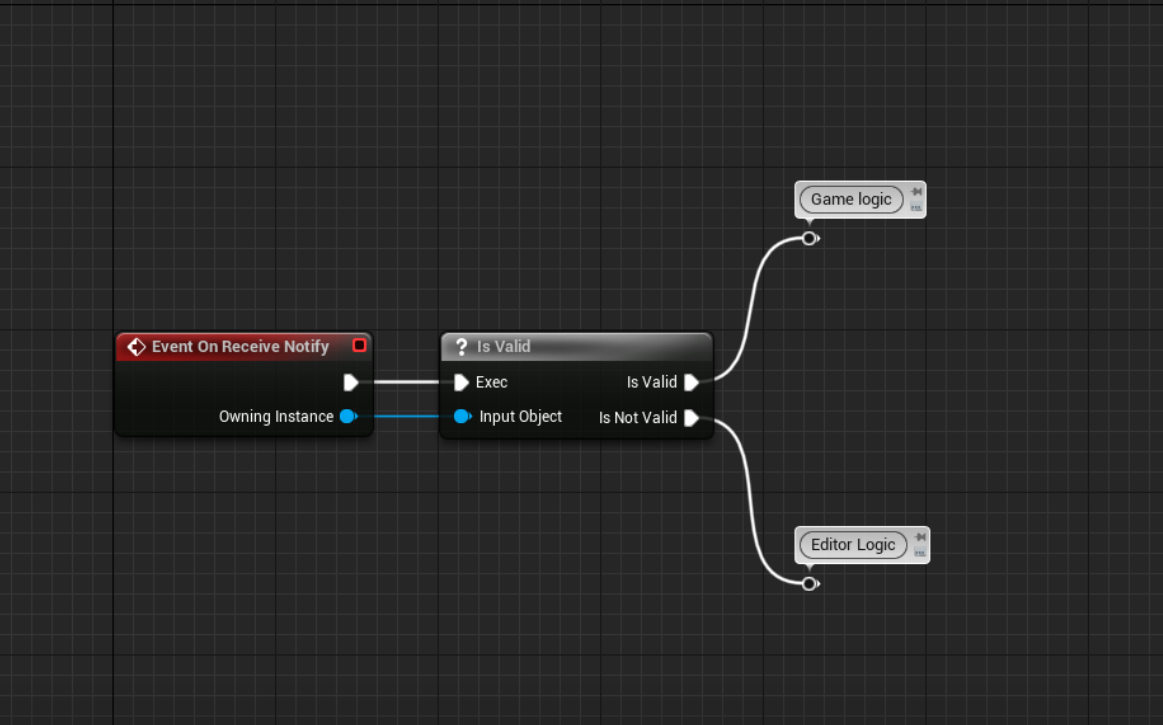
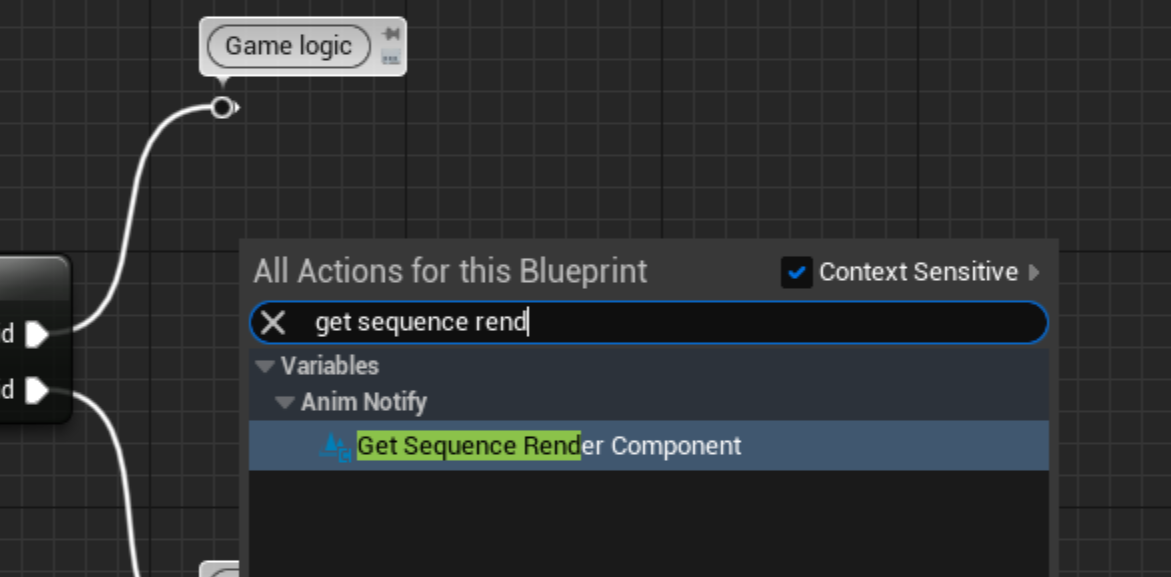
If needed, you can obtain the “Render Component”, that is used to render the animations, which you can use to add sounds, particles, or even debug boxes for displaying.
In the following example, we use the Render component location to identify where a sound should be played while playing the game. In Editor logic we draw a debug box, that will only be displayed during the Animation Source Editor window. This can be useful for creating “Hitboxes” that are drawn on the editor window (so we can adjust them as needed), while the game-behavior would actually apply the Hitbox without showing it.
In this section, we’ll share assorted information that couldn’t be added on other chapters.